Butter mochi is a delightful blend of chewy texture and rich flavor, making it an irresistible treat that everyone will love. This easy recipe guides you through creating addictive dessert squares that highlight the comforting taste of butter while incorporating the unique chewiness of mochi. Whether you’re looking to impress guests at a gathering or satisfy your own sweet tooth, these chewy bites are not only simple to make but also allow for creativity in flavors and toppings.
Imagine pulling a tray of freshly baked butter mochi out of the oven, the warm aroma filling your kitchen and sparking joyful memories of family gatherings. This dessert is perfect for all skill levels, requiring just a few basic ingredients and minimal prep time. Plus, it’s a wonderful way to explore the delightful world of Asian-inspired sweets right in your own home. So grab your mixing bowl and let’s dive into the fun of making these chewy, buttery squares that are sure to become a favorite!
Perfect Butter Mochi: Key Ingredients You Need
If you’ve ever tasted Butter Mochi, you know that its unique combination of chewiness and sweetness is simply addictive. This Hawaiian delicacy primarily relies on a few key ingredients that not only create its distinctive texture but also imbue it with rich, buttery flavor. To make the perfect Butter Mochi, here’s what you’ll need on your shopping list.
Essential Ingredients
- Glutinous Rice Flour: Also known as sweet rice flour, this ingredient is essential for achieving the chewy texture that defines Butter Mochi. Make sure to use glutinous rice flour, as regular rice flour won’t provide the same results.
- Coconut Milk: A key player in the flavor profile, coconut milk adds creaminess and a subtle sweetness. It’s best to use full-fat coconut milk for a richer taste.
- Granulated Sugar: This is what makes your Butter Mochi sweet and enjoyable. Adjust the amount to suit your taste, but keeping it around ¾ cup is standard for a balanced flavor.
- Butter: Using melted unsalted butter adds that unmistakable richness and depth of flavor. You can also experiment with flavored butters to enhance your mochi.
- Eggs: These help bind the ingredients together and add tenderness to the final texture. One or two large eggs will do the trick.
As you gather your ingredients, remember that quality matters. Using good-quality coconut milk and fresh eggs can elevate your Butter Mochi from simply good to absolutely irresistible. Each component plays a crucial role, ensuring that every bite is a delightful blend of sweetness and chewiness that speaks to the heart of Hawaiian dessert culture. Now, let’s get cooking and bring a taste of Hawaii right into your kitchen!
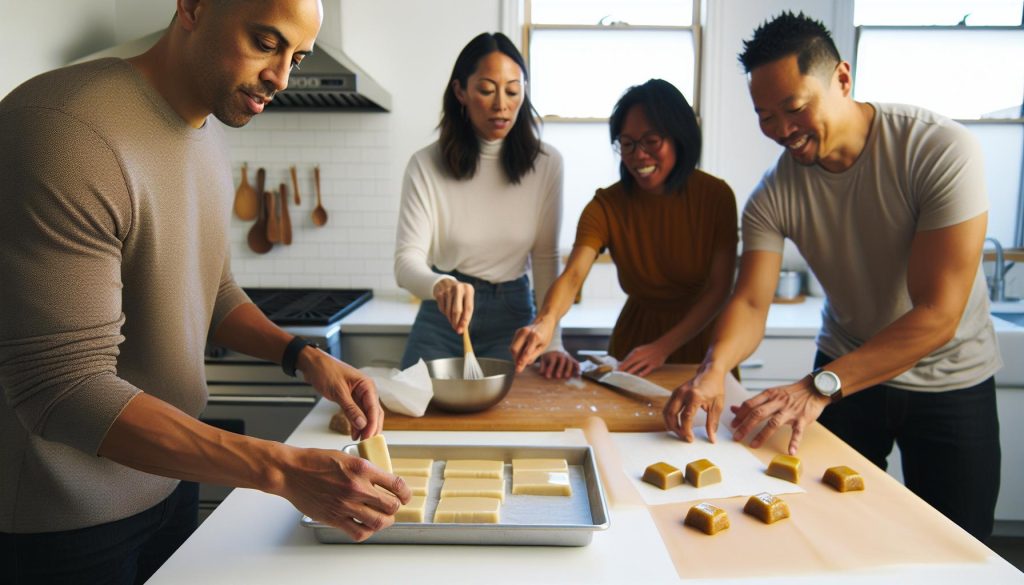
Step-by-Step Guide to Making Butter Mochi
To create those irresistibly chewy Butter Mochi squares, you’ll find that the process is quite straightforward and deeply satisfying. This Hawaiian treat offers a delightful combination of flavors and textures, making it a favorite for gatherings or a sweet treat at home. Ready your kitchen, as we’re about to embark on an exciting journey to whip up this delightful dessert!
Begin by preheating your oven to 350°F (175°C). This step ensures that when your mochi batter is ready, it will bake evenly and achieve that golden hue. Next, grab a medium-sized mixing bowl and combine your dry ingredients: 1 cup of glutinous rice flour, ¾ cup of granulated sugar, and a pinch of salt. Whisk these together until they’re well combined-this prevents any clumps in your final dish.
In another bowl, mix together your wet ingredients. You’ll need 1 cup of full-fat coconut milk (for richness), 5 tablespoons of melted unsalted butter, and 1 to 2 large eggs. If you’re feeling experimental, this is a great moment to incorporate flavors like vanilla extract or even a splash of almond extract for a nutty depth. Blend the wet ingredients until smooth and creamy.
Once your dry and wet ingredients are ready, gradually pour the wet mixture into the dry bowl, stirring continuously until you achieve a smooth batter. The consistency should be a bit thick, much like pancake batter. Now, grease a square baking pan (around 8×8 inches works perfectly) and pour in your mochi batter, spreading it evenly.
Transfer the baking pan to your preheated oven and let it bake for about 30-35 minutes. You’ll know your Butter Mochi is done when the edges start to pull away slightly from the sides of the pan and the center looks set. Allow it to cool in the pan for about 10 minutes before transferring it to a wire rack. Patience is crucial here! Letting it cool completely before cutting into squares ensures that each piece retains that chewy perfection.
With just a handful of steps and easily accessible ingredients, you’ll have homemade Butter Mochi that not only tastes fantastic but also fills your home with a warm, inviting aroma. Enjoy this delightful treat with friends and family, or savor it on your own-you deserve it!
Secrets to Achieving the Perfect Chewy Texture
To master the art of achieving that delightful chewy texture in Butter Mochi, it’s essential to focus on a few key factors throughout the process-from your choice of ingredients to baking techniques. The unique texture of Butter Mochi comes from the use of mochiko (glutinous rice flour), which is what gives this Hawaiian dessert its signature chewiness. Unlike regular flour, mochiko helps retain moisture and creates a sticky, dense consistency that is both satisfying and addictive.
A common trick for ensuring perfect texture is to not overmix the batter once the wet and dry ingredients are combined. Overmixing can develop too much gluten, leading to a tougher mochi. Instead, whisk just until the ingredients are combined and smooth. After baking, let your Butter Mochi cool in the pan for about 10 minutes, then transfer it to a wire rack to cool completely. This resting time allows the moisture to redistribute evenly, enhancing that chewy bite you love.
Testing for Doneness
The key to achieving the right texture also lies in proper baking. You’ll know your mochi is done when the edges start to pull away from the pan and the center looks set but slightly jiggly. A toothpick inserted should come out with a few moist crumbs but not wet batter. If you overbake, your mochi may turn out dry and crumbly, so keep a close eye on it in the last few minutes of baking.
Rest and Slice
Once cooled, resist the temptation to dive right in! It’s crucial to let your Butter Mochi rest overnight at room temperature or in the fridge. This additional time allows the mochi to firm up just enough, which makes slicing into perfect squares much easier. The result? A chewy, dreamy dessert that will impress at any gathering or simply during a snack break at home. So, embrace the process and enjoy every step-you’re on your way to creating a scrumptious treat that’s perfectly chewy!
Creative Flavor Variations for Butter Mochi
There’s something magical about taking a classic recipe and giving it a personalized twist, and Butter Mochi is no exception! This beloved Hawaiian treat is wonderfully adaptable, allowing you to explore creative flavor variations that can elevate your mochi squares from delightful to extraordinary. Whether you’re craving something fruity, nutty, or downright indulgent, these ideas will spark your imagination in the kitchen.
One of the simplest ways to enhance your Butter Mochi is by incorporating extracts and zests. Vanilla, almond, or coconut extracts can add distinct flavors that blend beautifully with the sweet, chewy base. For a refreshing twist, consider adding the zest of a lemon or lime for a citrusy lift. Additionally, mixing in mashed ripe bananas or pureed pumpkin not only alters the flavor profile but also contributes to the moistness that makes Butter Mochi so delicious.
If you’re a chocolate lover, don’t hold back! Stir in cocoa powder or chocolate chips to create a rich, chocolatey version of Butter Mochi. For an extra touch of decadence, drizzle some melted chocolate over the top after baking. Feeling adventurous? Try incorporating matcha powder for a green tea version that adds an earthy flavor and stunning color.
For those who enjoy texture, consider folding in small bits of nuts or dried fruits like macadamia nuts, walnuts, or shredded coconut. These additions will not only enhance the chewiness of your mochi but also create a delightful contrast with its smooth interior. Mochi with berries, such as chopped strawberries or blueberries, delights the palate with bursts of juicy sweetness, while a dash of sea salt on top can heighten all the flavors and make them pop.
Experimenting with these variations is part of the fun! The beauty of Butter Mochi lies not only in its tender, chewy texture but also in how easily it can be adapted to whatever you have on hand or whatever cravings arise. So don your apron, gather your ingredients, and let your culinary creativity shine through each delicious square!
How to Store and Reheat Butter Mochi
Storing your Butter Mochi properly is key to maintaining its chewy, addictive texture. The good news is that this delightful dessert is quite forgiving and can be enjoyed for several days when stored correctly. Allow your freshly baked Butter Mochi to cool completely in the pan before cutting it into squares. Once cool, transfer the individual pieces to an airtight container. This helps retain moisture and prevents them from drying out.
For longer shelf life, you can freeze Butter Mochi. Just wrap each square tightly in plastic wrap, followed by aluminum foil, to protect against freezer burn. Then, place them in a resealable freezer bag. When you’re ready to indulge in a sweet treat, simply pull a piece from the freezer and let it thaw at room temperature for about an hour. Alternatively, if you’re in a hurry, you can microwave it for about 10-15 seconds to enjoy a warm treat right away!
Reheating Butter Mochi
Reheating your Butter Mochi is simple and can bring back that fresh-from-the-oven taste. Here are some methods to consider:
- Microwave: Place a piece on a microwave-safe plate and cover it with a damp paper towel. Heat in short intervals of 10-15 seconds. This method keeps the mochi moist while warming it.
- Oven: Preheat your oven to 350°F (175°C). Arrange the mochi squares on a baking sheet and cover them loosely with aluminum foil. Heat for about 10-15 minutes, just until warmed through.
- Steamer: If you have a steamer, this is a fantastic way to rehydrate and warm your mochi without drying it out. Simply steam for a few minutes until warmed and soft.
By following these simple storage and reheating tips, you can enjoy your Butter Mochi days after making it, keeping that deliciously chewy texture intact! Enjoy your baking adventure and relish in the delightful taste of your homemade treat whenever you like.
Serving Suggestions: Enjoying Your Mochi Squares
There’s something undeniably delightful about enjoying butter mochi, especially when you take that first chewy bite filled with a rich, buttery flavor. As you treat yourself to these sweet squares, consider the various ways you can enhance this already indulgent dessert. Whether serving them at a gathering or savoring them solo, butter mochi can fit seamlessly into any occasion.
One simple way to elevate your butter mochi experience is by pairing it with a delightful dipping sauce. A quick coconut or chocolate sauce can complement the mochi’s flavors perfectly. To make a coconut sauce, gently heat coconut cream, adding a dash of vanilla extract and a touch of sugar until it’s silky smooth. For chocolate lovers, melted dark chocolate with a hint of sea salt creates a decadent treat.
If you feel adventurous, think about adding some fresh fruit on the side. Slices of ripe mango, strawberries, or even a scoop of tropical sorbet can brighten up each serving, providing a refreshing contrast to the buttery richness. You could also serve your mochi with a sprinkle of toasted coconut flakes or some chopped nuts for an extra crunch.
Don’t forget to consider the setting! These squares make for a beautiful addition to a dessert table for celebrations or informal gatherings. Present them on a vibrant platter, garnished with mint leaves for a pop of color, and watch as guests delight in choosing their pieces.
With such versatility, butter mochi squares can easily transition from a cozy evening snack to an impressive party treat. Play around with different presentations and pairings to find what you love most, and share your creative combinations with friends and family-it’s all part of the fun of baking!
Troubleshooting Common Butter Mochi Mistakes
When embarking on the delicious journey of making butter mochi, a few common pitfalls can turn your sweet endeavor into a frustrating experience. Luckily, with some simple troubleshooting tips, you can master this iconic Hawaiian treat and enjoy its rich, buttery flavor in no time.
One frequent mistake is ending up with a dry or crumbly texture. This often happens when the batter is over-mixed or if it’s baked for too long. Ensure that you mix the ingredients just until they’re combined. The batter should be smooth but not overworked; think of it as a gentle stir rather than a vigorous whip. When baking, keep a close eye on the mochi, and remember that it should be taken out while it’s still slightly jiggly in the center. The residual heat will finish cooking it as it cools.
Another issue might arise from using the wrong type of flour. Butter mochi is best made with mochiko or sweet rice flour, which gives it that desirable chewy texture. Using regular rice flour or all-purpose flour will lead to a different-often undesired-outcome. If you find yourself with a gummy or overly sticky texture, it’s likely that the wrong flour was used or that too much liquid was added. Make sure to measure your ingredients carefully, and if possible, stick to the recommended brands for reliability.
The flavor can sometimes be less than expected. If your butter mochi doesn’t have that deep, rich taste, revisit your ingredients. High-quality coconut milk and fresh butter can make a world of difference. For an extra flavor boost, consider adding a touch of vanilla extract or a scoop of your favorite cocoa powder to the batter. Each of these additions can enhance the overall taste without overshadowing the traditional flavor.
Lastly, if your butter mochi seems to be falling apart when cut, it might not have cooled completely. Let the mochi sit in the pan for at least 15 minutes before slicing, and for best results, refrigerate it for a bit. Chilling helps it firm up and makes cutting easier. Use a sharp knife and lightly oil it to prevent sticking as you slice through those delightful squares.
By troubleshooting these common mistakes with a bit of patience and care, you’ll be well on your way to perfecting your butter mochi, ensuring that each batch is as chewy and addictive as it’s meant to be! Happy baking!
Nutritional Information: Enjoying in Moderation
When indulging in the delightful world of butter mochi, it’s essential to consider not just how delicious these chewy squares are, but also how they fit into a balanced diet. Butter mochi is a combination of sweet rice flour, coconut milk, butter, and sugar, resulting in a rich and satisfying treat that’s hard to resist. Understanding its nutritional components can help you enjoy it mindfully.
Butter mochi is relatively high in calories due to its ingredients. A typical serving can range from 150 to 200 calories, depending on the portion size and specific ingredients used. While it offers quick energy, it’s also important to keep portion control in mind, especially since it’s easy to snack on too many squares without realizing it. To help balance enjoyment with health, consider slicing your butter mochi into smaller pieces; this way, you can savor the flavor without overindulging.
Nutritional Breakdown
Here’s a general look at the nutritional content for a 1-inch square of butter mochi:
| Nutrient | Amount per Serving |
|---|---|
| Calories | 160 |
| Total Fat | 7g |
| Saturated Fat | 4g |
| Carbohydrates | 24g |
| Dietary Fiber | 1g |
| Sugars | 10g |
| Protein | 2g |
While these treats can provide happiness in a chewy bite, they do contain substantial amounts of fat and sugar. As with any indulgence, moderation is key. Pairing butter mochi with a fruit or a cup of tea can add freshness and balance to your dessert experience. Also, considering making variations with whole ingredients, or exploring recipes with reduced sugar can make these delightful squares a bit healthier without sacrificing flavor.
In essence, butter mochi can be a fantastic dessert option when enjoyed wisely. It’s not only about treating yourself but also about being mindful of how it fits into your overall dietary habits. Embrace the joy it brings, and remember that it’s all about balance!
Butter Mochi vs. Traditional Mochi: What’s the Difference?
Butter mochi and traditional mochi may share a name and some similar textures, but they diverge significantly in ingredients, preparation methods, and overall flavor profiles. Traditional mochi, typically made from glutinous rice or sweet rice, is pounded into a soft, sticky dough. This versatile treat can be enjoyed in various forms: sweetened with fillings like red bean paste or served in savory dishes. Its base is gluten-free, making it popular among those with gluten sensitivities.
In contrast, butter mochi introduces a rich creaminess that comes from the addition of butter and often coconut milk. This makes it more akin to a cake, achieving a dense and chewy texture that’s delightfully different from the more elastic nature of traditional mochi. The ingredients blend into a batter that’s poured into a pan and baked until golden brown, resulting in a chewy square that’s both satisfying and indulgent. The use of sweet rice flour gives butter mochi its signature chewy characteristic, but the flavor is enriched with buttery sweetness, often reminiscent of a sweet coconut dessert.
Key Differences
- Base Ingredients: Butter mochi relies on sweet rice flour, coconut milk, and butter, while traditional mochi is primarily made from glutinous rice.
- Preparation: Butter mochi is baked, molding it into chewy squares, whereas traditional mochi is pounded into a dough consistency and formed by hand.
- Flavor and Texture: Butter mochi has a richer, more decadent flavor with a cake-like texture, while traditional mochi is generally softer with a chewy, sticky consistency.
- Uses: Traditional mochi is often served plain, with fillings, or in desserts like mochi ice cream, while butter mochi is typically served as a standalone dessert, enjoyed in squares.
This delightful contrast means that while both types of mochi are beloved, they cater to different cravings. If you’re in the mood for something rich and sweet, butter mochi is sure to satisfy. However, if you prefer a light, chewy treat, then traditional mochi could be your go-to. Exploring both can lead to delicious discoveries and add variety to your dessert repertoire!
Unique Pairings for Butter Mochi: Dessert Ideas
Butter mochi is delicious on its own, but pairing it with complementary flavors can take your dessert experience to the next level. Imagine biting into a warm, chewy square of butter mochi and being transported by the mix of flavors and textures that lift it to new heights. Here are some delightful ideas to enhance your butter mochi experience.
Start with a classic pairing: fresh tropical fruits. The sweetness of butter mochi combined with the juiciness of mango, pineapple, or even coconut will create a refreshing contrast. Simply slice up some ripe fruit and arrange it on a plate alongside your mochi squares. For an extra twist, try grilling the fruits briefly to caramelize their natural sugars before serving.
Another delicious option is to serve your butter mochi with spreads and dips. A drizzle of salted caramel or chocolate sauce can add richness, while a light coconut cream or whipped cream can offer a luscious, creamy element. Consider adding a sprinkle of toasted coconut or crushed nuts on top for added texture and flavor.
For a more adventurous approach, why not plate your butter mochi with a scoop of mango or coconut ice cream? The cold, creamy ice cream contrasts beautifully with the warm, chewy mochi and creates a delightful balance that is hard to resist. You could also try pairing it with a scoop of matcha ice cream for a unique flavor combination that enhances the mochi’s sweetness with a subtly bitter note.
Lastly, don’t overlook the magic of beverages. Pair your butter mochi with a cup of rich, aromatic tea, such as a buttery oolong or a floral jasmine tea, which can enhance the overall tasting experience. Alternatively, a light sparkling beverage can cleanse the palate and add a fun fizz to the dessert course.
No matter how you decide to serve it, creativity is key. Each pairing you experiment with will bring out different aspects of the butter mochi, inviting your friends and family to enjoy a truly special dessert experience!
Great Occasion for Butter Mochi: When to Serve
There’s something truly special about sharing a plate of butter mochi with friends and family, making it the perfect treat for various occasions. Its chewy texture and delightful flavor can elevate any gathering, whether it’s a casual potluck or a festive celebration. One of the best aspects of butter mochi is its versatility; it can be the star of your dessert table or a charming addition to a larger spread.
Holidays and Celebrations: Butter mochi shines during holidays like Luaus, Thanksgiving, or even Christmas gatherings. Its unique texture and buttery taste offer a refreshing change from traditional desserts like pies and cakes. Pair it with tropical fruits for a festive touch, or sprinkle some shredded coconut on top to evoke island vibes.
Casual Get-Togethers: If you’re hosting friends for a game night, dinner party, or movie marathon, butter mochi can be a delightful, easy-to-make dessert. Pre-slice it into squares and serve on a platter for casual munching. You could also offer a variety of dips or ice creams so guests can customize their servings.
Celebrating Milestones: From birthdays to graduations, butter mochi can make any milestone feel even more special. If you’re looking to impress guests, consider incorporating flavorful twists into your butter mochi, such as adding matcha for a unique color and flavor. It’s an easy way to show your creativity and make the event memorable.
Seasonal Events: Don’t forget to bring butter mochi to seasonal fairs or community events. Its chewy, satisfying consistency makes it an ideal treat for outdoor gatherings or picnics. Pack it in a container and pair with a refreshing drink like iced tea or lemonade for a perfect picnic basket addition.
No matter when you choose to serve it, butter mochi invites everyone to savor its warmth and sweetness while creating memories together. So, roll up your sleeves, gather your ingredients, and let this delightful dessert shine at your next occasion!
Q&A
Q: What is the best way to serve butter mochi?
A: The best way to serve butter mochi is to slice it into small squares and enjoy it warm or at room temperature. Pairing it with a scoop of vanilla ice cream or drizzling it with chocolate sauce can enhance the flavors. *For more serving suggestions, refer to our section on serving ideas.*
Q: Can I use dairy-free butter in my butter mochi recipe?
A: Yes, you can substitute dairy-free butter for regular butter to make a dairy-free version of butter mochi. This adjustment won’t affect the chewy texture and will be a great option for those with dietary restrictions. *Check our key ingredients section for more details on substitutions.*
Q: How do I fix butter mochi that is too dry?
A: If your butter mochi is too dry, it may have been overcooked. To fix this, you can try reheating it in the microwave with a small cup of water to add moisture. Alternatively, ensure that you’re following the correct baking time mentioned in our step-by-step guide.
Q: What is the shelf life of butter mochi?
A: Butter mochi can be stored in an airtight container at room temperature for up to three days. For longer storage, refrigerate it for up to a week. *Refer to our storage section for tips on maintaining freshness.*
Q: Can butter mochi be frozen for later use?
A: Yes, butter mochi can be frozen! Wrap the squares tightly in plastic wrap or foil, and store them in a freezer-safe container. When you’re ready to enjoy, allow it to thaw at room temperature or heat it gently in the microwave. For more reheat advice, consult our reheating section.
Q: What makes butter mochi different from traditional mochi?
A: Butter mochi is denser and richer due to the addition of butter, while traditional mochi is typically chewy with a lighter, rice-flour-based texture. *For a deeper comparison, see our section on butter mochi vs. traditional mochi.*
Q: How can I achieve a more pronounced coconut flavor in butter mochi?
A: To enhance the coconut flavor in butter mochi, use coconut milk instead of regular milk and add shredded coconut to the batter. This will give you a delightful coconut kick! *Explore our flavor variations section for more tips.*
Q: What types of flour are best for making butter mochi?
A: The best flour for making butter mochi is sweet rice flour, also known as mochiko. It creates that characteristic chewy texture. Avoid using regular rice flour, as it will not yield the same results. *For ingredient specifics, check our key ingredients section.*
In Retrospect
Congratulations on mastering the art of Butter Mochi! These chewy, delightful dessert squares are not only simple to make but also a crowd-pleaser-perfect for any occasion. Want to experiment further? Explore our guide on the best butters for baking to elevate your treats even more or check out our delicious variations on mochi that are sure to please. Don’t forget to share your Butter Mochi creations with us in the comments below; we love seeing your kitchen adventures!
If you’re eager for more tasty recipes like this, consider signing up for our newsletter for the latest updates, tips, and special offers. Remember, making delicious desserts doesn’t have to be complicated, and with a few simple ingredients, you can create something extraordinary. So, gather your ingredients and get baking; your next flavorful experience is just a whisk away!


