Imagine biting into a warm, soft tortilla that’s rich with the flavor of butter-there’s nothing quite like it! This Butter Tortilla Recipe promises to deliver the perfect wrappers for tacos, burritos, or just to enjoy on their own. Not only are they incredibly easy to make, taking just about 35 minutes from start to finish, but they also require minimal ingredients that you likely already have in your kitchen.
Say goodbye to store-bought options that often taste bland and dry! Homemade butter tortillas are all about celebrating simplicity and the joy of cooking. Whether you’re a beginner or seasoned home cook, you’ll appreciate how easily these tortillas come together. They’re versatile and can be tailored to suit your favorite fillings or dips. So grab your apron, and let’s embark on this deliciously simple adventure in homemade tortillas that will surely elevate your meals!
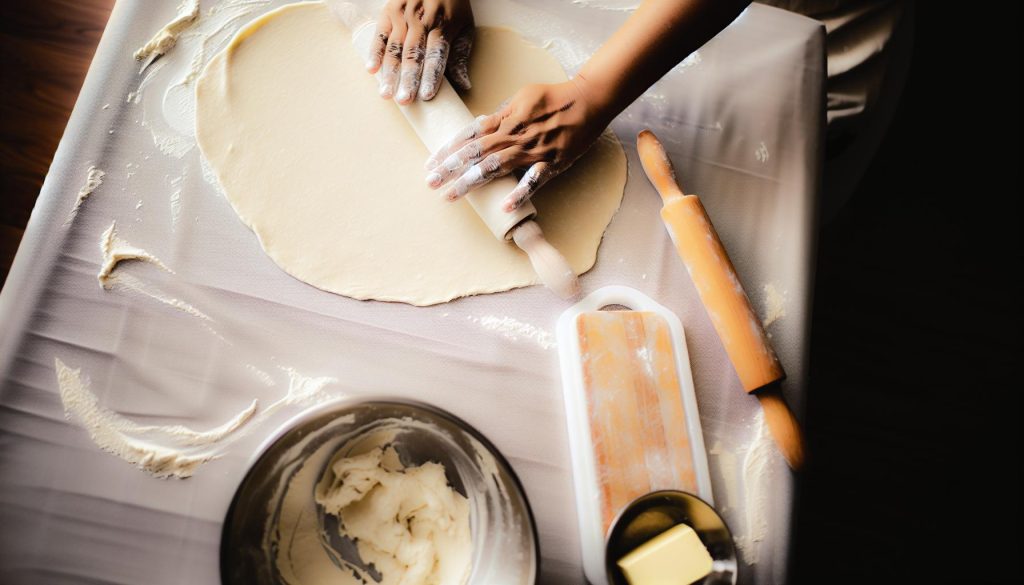
Butter Tortilla Recipe: Perfecting Soft, Flaky Wraps

When it comes to making the perfect butter tortillas, achieving a soft and flaky texture is key. The secret lies in a few fundamental techniques and the right approach to your ingredients. Butter adds not only richness but also a delicate layering that helps create that coveted flakiness. Whether you’re rolling them up for fajitas, enchiladas, or simply enjoying them warm with some butter, perfecting your butter tortilla creates a satisfying experience.
To start, you’ll need simple ingredients: flour, butter, salt, and warm water. The fat in the butter is crucial-it coats the flour particles, which helps prevent gluten formation, resulting in a tender tortilla. Use cold butter, and rub it into the flour until the mixture resembles coarse crumbs; this is your first step toward that flaky texture. Using warm water helps bring everything together without overworking the dough, which is essential for keeping that softness. Aim for a dough that’s smooth but not sticky.
Once you’ve mixed your ingredients, let the dough rest. This might seem like an optional step, but letting it sit for at least 15-30 minutes allows the gluten to relax, making rolling out easier. Roll your dough into balls and then flatten each one into circles. Cook them quickly in a hot skillet-just 30 seconds on each side should do the trick. You’ll know they’re done when they puff up and turn a light golden brown.
Lastly, to ensure your tortillas stay soft and pliable, wrap them in a clean kitchen towel right after cooking. This step keeps the steam in, which is critical for maintaining moisture. Embrace this process and don’t hesitate to experiment a little; the more you practice, the more you’ll refine your technique and discover the joys of homemade butter tortillas.
Essential Ingredients for Butter Tortillas

To craft the ultimate butter tortillas, the beauty lies in choosing the right ingredients that work in harmony to deliver a soft, flaky texture perfect for any filling. At the heart of this simple recipe are a few foundational elements. Each ingredient plays a significant role and should be selected with care to enhance your tortilla-making experience.
The main star in your ingredient lineup is all-purpose flour. Its gluten content provides the structure and elasticity needed while keeping the tortillas tender. For an even softer texture, you might also consider using a bit of cake flour or substituting part of the all-purpose flour with whole wheat flour for a nuttier flavor.
Another essential component is butter. Using unsalted butter allows you to control the saltiness of your tortillas. The fat in the butter not only adds rich flavor but also contributes to the desired flakiness. Make sure your butter is cold and cut into small pieces before you incorporate it into your flour. This method creates the small pockets of fat that help create those tender layers we love in a good tortilla.
You’ll also need salt to bring out the flavors, enhancing the overall taste of your tortillas. Finally, warm water binds everything together, facilitating a smooth dough. The warmth helps activate the flour without overworking it, maintaining that light and soft consistency.
Summary of Essential Ingredients
- All-Purpose Flour: Provides structure and tenderness.
- Butter (Unsalted): Adds flavor and flakiness.
- Salt: Enhances the flavor profile.
- Warm Water: Helps bring the dough together.
By focusing on these key ingredients, you’re not just following a recipe; you’re laying the groundwork for delicious and memorable butter tortillas. Embrace the process and enjoy the creativity that comes with homemade cooking!
Understanding the Role of Butter in Your Tortillas

Butter plays a pivotal role in transforming standard flour tortillas into a soft, flaky delight that can elevate any meal. The secret lies in its fat content, which not only enriches flavor but also changes the texture of your tortillas. When cold butter is mixed into the flour, it creates little pockets of fat that prevent the gluten from becoming tough during kneading and cooking. This results in tortillas that are tender and pliable-perfect for wrapping around your favorite fillings or simply enjoying on their own.
In your kitchen, the type of butter you choose can make a difference. Using unsalted butter gives you control over the salt level in your tortillas, allowing you to adjust to your taste. Butter’s rich flavor enhances the overall taste profile without overwhelming it, making every bite a little more delicious. It’s essential to integrate the butter into the flour properly; cutting it into small pieces before mixing ensures uniform distribution throughout the dough, contributing to that sought-after flakiness.
When making your tortillas, consider warming your water slightly. This warmth helps to melt that cold butter just enough, which facilitates the process of blending it smoothly with the flour. Just be careful not to add boiling water, as it can impact the dough’s texture adversely. The end result will reward your efforts: beautifully soft tortillas with flaky layers that add depth to whatever you decide to pair them with, from savory fillings to simple spreads.
In short, understanding butter’s importance in your tortillas is a game changer-whether you’re crafting a basic wrap or experimenting with interesting flavors. Enjoy the process, and don’t hesitate to play around with this delightful ingredient to achieve your perfect tortilla!
Step-by-Step Guide to Making Butter Tortillas
Making butter tortillas is a delightful way to elevate your meals with soft, flaky wraps that practically melt in your mouth. The process is straightforward, and you don’t need any specialized equipment to get started. Just a few basic ingredients and some hands-on technique can yield these delicious results in no time.
Start by gathering your ingredients. You’ll need:
- 2 cups all-purpose flour
- 1/2 teaspoon salt
- 1/4 cup unsalted butter, chilled and cubed
- 1/2 cup warm water (not boiling)
### Mixing the Dough
In a large mixing bowl, combine the flour and salt. This simple blend is the backbone of your tortillas. Next, add the cold butter, cutting it into the flour using your fingers or a pastry cutter. You want the mixture to resemble coarse crumbs, with some butter pieces visible for that flakiness we love in butter tortillas.
Once the butter is evenly mixed into the flour, gradually pour in the warm water. Mix with your hands until the dough starts to come together. It should be soft and slightly sticky but not wet. If it feels too dry, add a little more water, one tablespoon at a time.
### Kneading and Resting
Turn the dough out onto a lightly floured surface. Knead it gently for about 2-3 minutes until it’s smooth and elastic. Remember not to over-knead; we want to keep that tender texture. Once kneaded, wrap the dough in plastic wrap or cover it with a kitchen towel, and let it rest for at least 15-30 minutes. This step is crucial as it allows the gluten to relax, making your tortillas easier to roll out later.
### Rolling and Cooking
After the dough has rested, divide it into 10-12 equal pieces. Roll each piece into a ball and then flatten it slightly with your palm. Using a rolling pin, roll each ball into a thin circle, about 8-10 inches in diameter. Don’t worry about making them perfectly round; that’s part of the charm!
Heat a skillet or griddle over medium-high heat. Once hot, place a tortilla onto the skillet and cook for about 30 seconds, until you see small bubbles forming on the surface. Flip it over and cook for another 30 seconds. You’re looking for them to puff up slightly, indicating that the layers are separating. Repeat with the remaining tortillas, keeping them warm in a towel as you go.
### Final Touches
These butter tortillas are best enjoyed fresh, but they can be stored in a zip-top bag at room temperature for a few days. You can also freeze them for longer storage; just separate each tortilla with parchment paper to prevent sticking.
With this step-by-step approach, you’re well on your way to creating a versatile staple perfect for wraps, tacos, or even just enjoying with a little butter! So roll up your sleeves and get ready to whip up a batch of homemade goodness.
Tips for Achieving Perfectly Flaky Texture
Achieving that perfect flaky texture in your butter tortillas is like a little magic trick that can elevate any meal. The secret lies in your technique and a few simple adjustments throughout the process. To start, using cold butter is essential. When you cut chilled butter into your flour, it creates small pockets of fat. As these pockets melt during cooking, they leave behind air pockets, resulting in those delightful flaky layers.
Another tip is to avoid overworking your dough. Knead it just enough until it’s smooth and elastic-usually about 2 to 3 minutes. Over-kneading can develop too much gluten, which may yield a tougher texture rather than the tender, flaky result we aim for. Allowing the dough to rest is equally important; this gives the gluten time to relax, making rolling easier and ensuring those layers can form when cooking.
When it comes time to roll out your tortillas, be mindful of the thickness as well. Aim for a thickness of about 1/8 inch; this helps them puff and develop those flaky layers without becoming too dense. If your dough feels sticky, simply dust your work surface with a bit of flour instead of adding too much more flour into the dough, as this can change the texture.
Lastly, the cooking temperature is key. Make sure your skillet or griddle is hot enough; when the tortilla hits the pan, you should hear a gentle sizzle. If it’s too hot, you could burn the outside before the layers have a chance to separate. Flip your tortilla once you see small bubbles forming-this is a sign that the steam is doing its job! Following these tips will help you create the soft, flaky wraps that will make every bite a joyful experience.
Creative Variations on Classic Butter Tortillas
There’s something magical about the adaptability of butter tortillas. While these classic wraps are delicious on their own, a little creativity can elevate them to new culinary heights. The beauty of making your own tortillas is that you can experiment with flavors and ingredients to suit your taste preferences or to match whatever you’re serving them with.
One fun way to enhance your butter tortillas is by infusing them with spices or herbs. Adding a teaspoon of cumin or a sprinkle of smoked paprika to the dough can provide a warm, earthy flavor that’s perfect for pairing with savory fillings. Alternatively, incorporating fresh herbs like chopped cilantro or minced garlic into the dough not only adds flavor but creates a delightful aroma while cooking.
For those who enjoy a touch of sweetness, consider creating cinnamon-sugar tortillas. After cooking, brush your warm tortillas with melted butter, then sprinkle a mixture of sugar and cinnamon. These sweet tortillas are fantastic for breakfast, as a dessert option, or even as a fun snack, providing a delicious contrast to savory dishes. You can serve them with fresh fruits or a scoop of ice cream for an indulgent treat that’s sure to please everyone.
Even the cooking process for your butter tortillas can be varied. Try grilling instead of pan-frying for a smoky flavor and attractive grill marks. You could also experiment with different oils blended with butter for unique flavors; avocado oil, for example, has a high smoke point and a subtle flavor that complements many fillings.
Embrace the opportunity to customize your butter tortillas, making each batch a reflection of your culinary explorations. Whether you’re hosting a taco night or simply making lunch, these creative variations will make your wraps memorable and delicious!
Storing and Reheating Your Tortillas
When you invest time in making homemade butter tortillas, the last thing you want is for them to lose their freshness too quickly. Proper storage can ensure your tortillas stay soft and pliable, ready to be enjoyed with your favorite fillings or simply warmed up as a side.
For short-term storage, keep your butter tortillas in an airtight container at room temperature for up to 2 to 3 days. If you have made a bigger batch and want to extend their life, wrapping them in parchment paper, then placing them in a zip-top bag, is an excellent option. This method allows for easy reheating without them becoming too dry.
If you aim for longevity, refrigeration is your best bet, where they can last for up to 1 week. Before storing, let the tortillas cool completely if they’re freshly made, then stack them with parchment paper in between to prevent sticking. When you’re ready to enjoy them, a quick reheat is all they need-simply warm them in a skillet for about 30 seconds on each side or wrap a few in a damp paper towel and microwave them for 20-30 seconds until warm.
For even longer storage, consider freezing them! Tortillas can be stored in the freezer for up to 6 months. Again, stack them with parchment or wax paper in between, place them in a freezer-safe container or bag, and label with the date. When you’re ready to use them, defrost them overnight in the refrigerator or microwave a few at a time until they’re just warm. This way, you’ll always have a stash of soft, flaky butter tortillas on hand for any meal.
By following these simple storage and reheating tips, you can enjoy the deliciousness of your homemade butter tortillas for days or even months to come, making meal prep easy and enjoyable. Happy cooking!
Serving Suggestions: What to Pair with Butter Tortillas
There’s something incredibly satisfying about a warm, fresh butter tortilla. Not only are they a wonderful base for your favorite fillings, but they also shine when enjoyed simply on their own. The rich, buttery flavor pairs beautifully with a variety of dishes, enhancing meals while keeping the focus on wholesome ingredients. Here’s how to make the most of your homemade tortillas.
One delightful way to savor your butter tortillas is by creating classic quesadillas. Just layer your tortilla with cheese-think a sharp cheddar or creamy mozzarella-add in some sautéed vegetables like bell peppers and onions, fold it over, and cook it in a skillet until golden brown. You can also add shredded chicken, black beans, or roasted veggies for a heartier meal. Serve with a side of guacamole or sour cream for dipping-a perfect combination that balances the richness with tangy freshness.
Sweet Treats and Breakfast Ideas
Don’t overlook the sweet side of butter tortillas! You can quickly whip up a delicious dessert by spreading a bit of butter on a warm tortilla, sprinkling it with cinnamon and sugar, and rolling it up. If you’re in the mood for breakfast, try filling your tortillas with scrambled eggs, diced tomatoes, and avocado for a satisfying morning wrap. Drizzle a bit of hot sauce for an extra kick, and don’t forget to pair it with a side of fresh fruit to brighten your plate.
Creative Pairings
Experimenting is key when serving butter tortillas. Try pairing them with a bowl of chili or a hearty soup-the soft texture of the tortilla is perfect for scooping. You could also cut them into strips, bake until crisp, and use as dippers for salsa or hummus. If you’re entertaining, consider setting up a taco bar with various fillings such as grilled steak, fish, or roasted veggies. Allowing guests to create their own tacos can make for a fun, interactive dining experience!
Incorporating butter tortillas into your meals opens up a world of culinary enjoyment. Whether savory or sweet, these versatile wraps are a brilliant way to elevate everyday dishes. Enjoy the process and don’t hesitate to get creative!
Common Mistakes When Making Tortillas and How to Avoid Them
When it comes to crafting the perfect butter tortillas, even the best intentions can lead to some common pitfalls. Making tortillas should be a fun and rewarding experience, but understanding what can go awry ensures you’re well-prepared to create those soft, flaky wraps every time. Here are some of the most frequent mistakes and how to steer clear of them.
One common error is using too much butter. While butter adds a rich flavor and helps with texture, too much can make the tortillas overly greasy. Aim for a balanced amount that allows for a luscious flavor without compromising the dough’s integrity. A good rule of thumb is to start with two tablespoons per two cups of flour, adjusting slightly based on your preference for richness. Remember, the goal is to enhance the dough’s texture, not drown it!
Another mistake is not properly kneading the dough. Kneading is crucial for developing gluten, which gives the tortillas their desirable elasticity and chewiness. Knead your dough on a floured surface for about 5-8 minutes. If the dough feels sticky, resist the temptation to add excessive flour; instead, a little extra oil can help achieve the right consistency without making the dough tough.
It’s also vital to keep an eye on cooking times. Overcooking your tortillas can lead to dryness and a tough texture. When cooking, aim for just a few minutes on each side until you see light brown spots appearing. They should remain soft and pliable, perfect for wrapping! If you notice any signs of shrinking when you roll them out, that can indicate you’ve spent too much time on the heat, resulting in less flaky tortillas.
Lastly, remember that resting the dough is key. Once you’ve prepared your dough, let it rest for at least 30 minutes. This resting period allows the gluten to relax, making it easier to roll out and resulting in a tender tortilla. If you skip this step, you might find your tortillas springing back as you try to flatten them.
By paying attention to these aspects-balancing butter, kneading properly, monitoring your heat, and allowing ample resting time-you’ll be well on your way to producing delightful butter tortillas that impress at any meal! Embrace the process and don’t hesitate to experiment; every tortilla is a chance to create something beautiful. Happy cooking!
Nutritional Benefits of Homemade Tortillas
Homemade butter tortillas not only bring warmth and flavor to your meals but also pack a nutritional punch that store-bought varieties often lack. When you make tortillas from scratch, you have complete control over the ingredients, allowing you to customize the nutritional profile to fit your dietary needs.
One major benefit of homemade tortillas is that they typically contain fewer preservatives and additives than their commercial counterparts. By using whole ingredients like flour, butter, and water, you can create a product that is not only fresher but also lacks the questionable ingredients that come with processed options. Plus, using high-quality butter can add flavor while providing essential fatty acids that promote heart health.
Making your tortillas with whole-wheat flour or other whole grains can significantly enhance their nutritional value. Whole grains are rich in fiber, which aids digestion and helps maintain a healthy weight by keeping you feeling full longer. Additionally, homemade tortillas can be enriched with other nutritious elements. You might consider incorporating ground flaxseeds or chia seeds for added omega-3 fatty acids, or even finely chopped vegetables to boost vitamins and minerals in your wraps.
To give you an idea of the nutritional benefits, here’s a quick breakdown of what a typical homemade butter tortilla might offer (values may vary based on specific recipes):
| Nutrient | Amount per Tortilla (approx. 36g) |
|---|---|
| Calories | 110 |
| Fat | 5g |
| Carbohydrates | 15g |
| Fiber | 1g |
| Protein | 3g |
By opting for homemade, you’re not just making tortillas; you’re embracing a wholesome approach to cooking that can support your overall health while letting your creativity shine. So roll up your sleeves, put on your apron, and get ready to enjoy delicious, nutritious butter tortillas made right in your kitchen!
Exploring Flavor Enhancements for Butter Tortillas
To elevate your butter tortillas from delicious to extraordinary, consider incorporating some flavor enhancements that will not only enrich the overall taste but also personalize the experience to suit your palate. There’s no need to feel constrained by basic ingredients-getting creative with spices, herbs, and even fillings can turn your simple wrap into a culinary delight.
One of the easiest ways to add depth to your tortillas is by introducing spices directly into the dough. A sprinkle of garlic powder or smoked paprika can impart a lovely aroma and flavor. If you’re a fan of heat, try mixing in a dash of cayenne pepper or chili powder. Fresh herbs like cilantro or oregano finely chopped and added to the mix can also bring a burst of freshness, especially if you’re using them in southwestern or Mexican dishes.
You might also think about infusing your butter with flavor before using it in the tortilla recipe. For instance, herb-infused butter-made by melting butter with garlic and rosemary or with zesty lemon peel-can create a delightful surprise when used in your dough. This simple step can yield a nuanced flavor that complements many fillings, making every bite memorable.
For a unique twist, consider experimenting with alternative flours for the base. Mixing in cornmeal or whole wheat flour not only adds nutrition but also contributes a distinct taste profile. If you want a bit of sweetness and color, try incorporating beet powder or turmeric-both of which can provide not just flavor but also a beautiful hue to your tortillas.
To wrap it all up, enhancing the flavor of your butter tortillas is all about paying attention to personal preferences and taking the leap into experimentation. The combinations are endless, and every modification brings a chance to discover something new that works perfectly alongside your favorite fillings. So don’t be afraid to get brave in the kitchen-your taste buds will thank you!
Troubleshooting Common Tortilla Issues
When making butter tortillas, it’s not uncommon to encounter some challenges along the way, but don’t worry! With a few helpful tricks up your sleeve, you can troubleshoot and enhance your tortilla-making experience, ensuring those wraps turn out perfectly soft and flaky every time.
Sometimes, your tortillas may come out too dry or stiff. This often happens if the dough has too little moisture. To fix this, try adding a little more water or melted butter to your dough. Aim for a moisture level that allows you to knead the dough without it sticking excessively to your hands. Additionally, letting your dough rest for at least 30 minutes covered with a damp cloth can improve elasticity and result in softer tortillas.
Another common issue is tortillas that are tough or chewy. This can be attributed to over-kneading the dough or cooking them too long. The goal is to knead just until combined and then roll them out gently. Cook each tortilla for about 30 seconds on each side; you should see a few golden brown spots but not a complete color change. If your tortilla puffs, that’s a great sign! It means the steam is working its magic, contributing to a soft texture.
Flaking upon rolling can also be a problem. If your tortillas crack or break, it might be due to using flour that doesn’t have enough protein content. Using a higher-gluten flour or adding a bit of vital wheat gluten can help create a more pliable dough. Remember to roll your tortillas out to a consistent thickness; uneven spots can lead to uneven cooking and flakiness.
Finally, if you’re struggling to get your tortillas off the skillet without sticking, consider upgrading your cooking tool. A well-seasoned cast iron skillet or a non-stick pan can make a world of difference. Lightly dust your tortillas with flour to help prevent sticking during cooking.
By tuning into these common issues and adjusting your approach, you’ll be well on your way to mastering the art of butter tortillas. Each attempt is a learning experience that helps shape your cooking skills, so embrace the process and enjoy your time in the kitchen!
The History and Tradition Behind Tortillas
Tortillas have a rich history steeped in culture and tradition that goes back thousands of years. Originally crafted by the indigenous peoples of Mesoamerica, these flatbreads were a staple of their diets, made from corn that was ground into masa and cooked on hot stones. The word “tortilla” derives from the Spanish word for “little cake,” which reflects their evolution as they were introduced to wheat flour by Spanish colonizers in the 16th century. This fusion of ingredients brought about the flour tortilla, a versatile base for countless dishes.
In many Mexican families, making tortillas is more than just cooking; it’s a cherished ritual passed down through generations. The process is often communal-grandmothers teach their children the art of kneading and rolling, infusing each tortilla with love and family heritage. Today, as you prepare your butter tortillas at home, consider the historical significance of your ingredients. By using simple components like flour, butter, and water, you’re connecting with a culinary tradition that has nourished countless people.
Butter tortillas, specifically, have gained popularity for their rich flavor and flaky texture. The addition of butter elevates the traditional recipe, bringing in a creamy richness that pairs beautifully with both sweet and savory fillings. This adaptation aligns well with modern culinary trends, where home cooks experiment with recipes to create delightful twists on classic dishes. As you take on the task of making butter tortillas, remember that each fold and flip contributes to a timeless tradition that celebrates creativity in the kitchen, making it accessible for everyone, regardless of experience.
Incorporating this knowledge into your cooking can enhance not just the flavor, but also the enjoyment of sharing your homemade creations. So, when you roll out that dough, think of the hands that have shaped tortillas before you and the many meals they have accompanied. Your butter tortillas are not just wraps; they’re a delicious continuation of a vibrant culinary legacy. Enjoy every bite and embrace the joy of crafting something truly special!
Faq
Q: How can I achieve the perfect soft texture in my butter tortillas?
A: To achieve a perfectly soft texture in butter tortillas, ensure to knead the dough just until combined and let it rest for at least 30 minutes. This allows the gluten to relax, resulting in flaky and tender tortillas. Also, cook them just until they puff up for optimal softness.
Q: What is the best way to store homemade butter tortillas?
A: To store homemade butter tortillas, wrap them tightly in plastic wrap or aluminum foil and place them in an airtight container. They can be refrigerated for up to a week or frozen for up to three months. Reheat them on a skillet or in the microwave for the best texture.
Q: Can I substitute other fats for butter in this tortilla recipe?
A: Yes, you can substitute other fats like lard or oil for butter in your tortilla recipe. Each fat will impart a different flavor and texture, so feel free to experiment to find your preferred result. Lard will yield a richer taste, while oil provides a lighter option.
Q: Why are my butter tortillas turning hard after cooking?
A: If your butter tortillas are turning hard, it may be due to overcooking. Ensure you cook them on medium heat for a short period, just until they are lightly browned. Additionally, keeping them covered after cooking will help maintain their softness.
Q: How can I enhance the flavor of my butter tortillas?
A: You can enhance the flavor of your butter tortillas by adding seasonings like garlic powder, onion powder, or fresh herbs to the dough. Additionally, brushing the warm tortillas with melted garlic butter right after cooking adds an extra layer of flavor[2].
Q: What is the ideal thickness for butter tortillas?
A: The ideal thickness for butter tortillas is about 1/8 inch. This thickness allows for even cooking and ensures the tortillas remain soft and pliable. If they are too thick, they may not cook through; if too thin, they might tear [1].
Q: How long should I rest the dough for butter tortillas?
A: Allow the dough for butter tortillas to rest for at least 30 minutes. This resting period is crucial as it relaxes the gluten, making it easier to roll out and contributing to a softer texture once cooked [1].
Q: How can I prevent my tortillas from sticking to the cooking surface?
A: To prevent tortillas from sticking, use a well-heated skillet and a small amount of oil or butter on the surface. You can also place parchment paper between tortillas when storing or stacking them to avoid sticking [3].
Key Takeaways
Now that you have mastered the art of making soft, flaky butter tortillas, it’s time to put your creativity to the test! Whether you’re wrapping up your favorite fillings or enjoying them with a simple spread, these tortillas are bound to impress. If you love this recipe, don’t miss our tips on creating homemade salsa and guacamole to elevate your meal-check them out for the perfect pairing!
Make sure to subscribe to our newsletter for more delicious recipes and kitchen tips, and drop a comment below with your thoughts or any variations you tried. Your feedback helps others in our cooking community! By the way, if you’re looking for more simple, delicious recipes, consider exploring our collection of no-bake desserts and gourmet butter techniques. Happy cooking, and remember, every great meal starts with a little experimentation. Enjoy your homemade tortillas and see you again soon!


