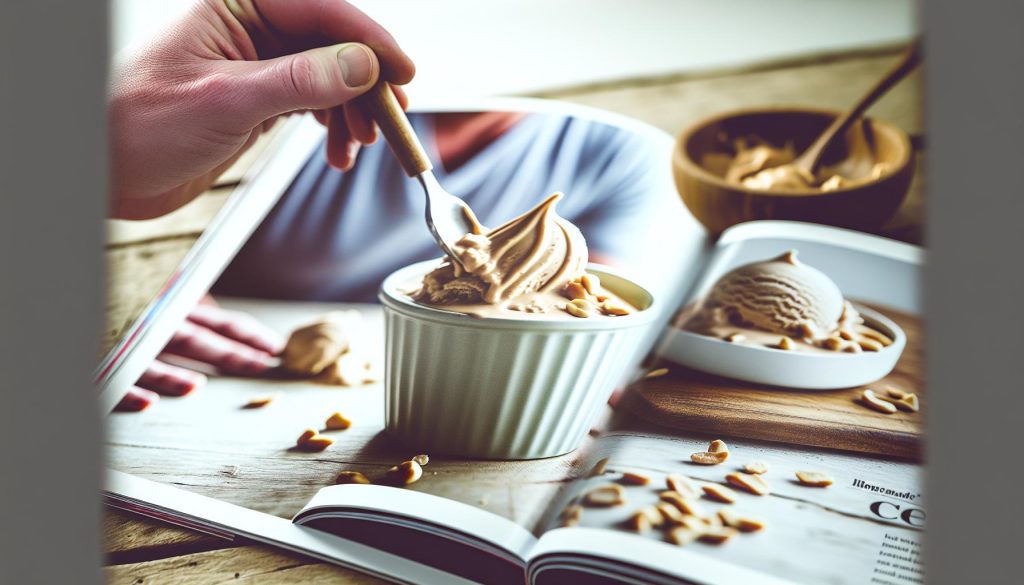
Did you know that you can whip up a delicious batch of peanut butter ice cream without any fancy machine? This easy, no-churn recipe brings the rich, nutty flavor of peanut butter to life, making it a perfect treat for any season. Whether you’re craving a sweet finish to your family dinner or a refreshing snack on a hot day, this homemade ice cream is not only simple to make but also customizable to suit your taste buds. With just a few pantry staples, like peanut butter, sugar, and cream, you can create a creamy delight that feels like a indulgent scoop from your favorite ice cream shop. Plus, making it at home means you control the ingredients-no preservatives or artificial flavors here! So grab your mixing bowl and get ready to enjoy a made-from-scratch dessert that will impress friends and family alike. Your taste buds will thank you!
Choosing the Right Peanut Butter for Creamy Perfection
Choosing the right peanut butter can transform your homemade ice cream from delicious to dreamy. The flavor, texture, and creaminess of your ice cream will largely depend on the peanut butter you select, so it’s worth taking the time to choose wisely. Generally, you’ll want to go for a smooth, creamy variety, as this will blend seamlessly into your ice cream base, creating that rich, velvety texture we all crave.
When shopping for peanut butter, consider these key factors:
- Ingredients: Look for natural peanut butter that contains just peanuts and possibly a bit of salt. Avoid brands with added sugars or oils, as these can affect the creaminess and flavor of your ice cream.
- Flavor Profile: The taste of your peanut butter should complement the other ingredients in your ice cream. For example, a roasted variety can add a deeper nutty flavor, while a honey-infused peanut butter will lend a touch of sweetness.
- Texture: If you’re after a classic peanut butter ice cream, a creamy texture is a must. For a crunchy twist, consider incorporating a chunky peanut butter, but remember it may change the texture of the final product.
Another fun idea is to blend different types of peanut butter. Experimenting with a mix of creamy and crunchy can add delightful surprises to your ice cream texture. Don’t hesitate to taste the peanut butter on its own before adding it to your mixture; this will help you gauge how it will influence the final flavor and decide if any additional sweeteners are needed. With these tips in mind, your journey to making the perfect peanut butter ice cream will surely lead to some mouthwatering results!
Essential Ingredients for Homemade Ice Cream

Creating your own peanut butter ice cream at home is not just enjoyable; it’s a delightful way to experiment with flavors and textures in the kitchen! The secret to a creamy, satisfying ice cream lies in its essential ingredients. Let’s dive into what you’ll need for this easy no-machine recipe that will impress friends and family alike.
To start, you’ll need a couple of basic dairy staples: milk and heavy cream. These two components work together to create a rich base. Heavy cream contributes to the ice cream’s creamy texture, while milk helps to balance the richness and add a lighter consistency. A safe ratio to use is about 1 part milk to 2 parts heavy cream.
Next, sugar is critical-not only does it sweeten your ice cream, but it also keeps the texture smooth by lowering the freezing point. Granulated sugar works perfectly, but you can also experiment with alternatives like brown sugar or honey for a different flavor profile. If you prefer a sweeter kick, you might also consider adding a spoonful of sweetened condensed milk for an ultra-creamy effect.
Of course, peanut butter is the star of the show! Choose your favorite creamy or chunky peanut butter, as both will yield delicious results. For a richer flavor, mixing in a touch of vanilla extract can elevate the taste, giving it that classic ice cream shop vibe. Don’t forget a pinch of salt to amplify the sweetness and balance the flavors.
Lastly, for a bit of texture and drama, consider adding some chocolate chips or chunks, or even bits of your favorite peanut butter cups into the mix. These little surprises will take your homemade ice cream to the next level, ensuring every scoop is a treat!
With these ingredients, you’ll have everything you need to create a simple but incredibly rewarding peanut butter ice cream. So roll up your sleeves, gather your ingredients, and get ready to savor the magic of homemade treats!
Step-by-Step Guide to Making Ice Cream Without a Machine

Making ice cream at home without a machine is easier than you might think, especially when it comes to rich and creamy peanut butter ice cream. With just a few basic ingredients and some simple steps, you can whip up a delicious frozen treat that will impress your family and friends. No fancy equipment is required-just a mixing bowl and a little patience!
Start by gathering your essential ingredients: heavy cream, milk, sugar, peanut butter, and a dash of vanilla extract. In a large mixing bowl, combine 1 cup of peanut butter with 1 cup of granulated sugar. Beat them together until the mixture is smooth and creamy. Then, gradually stir in 2 cups of heavy cream and 1 cup of milk. Adding these liquids in slowly helps maintain a light and airy texture that’s essential for ice cream. Make sure everything is well combined; you want a smooth, homogenous mixture. Don’t forget to add a pinch of salt-this will enhance the flavor and balance the sweetness.
Once your base is ready, it’s time to freeze! Transfer your mixture into a large, airtight container and place it in the freezer. Here comes the fun part: every 30 minutes for the first 2-3 hours, take the container out and give the ice cream a good stir using a whisk or a spatula. This process breaks up any ice crystals that may form, ensuring a smoother texture. Keep repeating this until the ice cream reaches your desired firmness, usually about 4-6 hours.
When your peanut butter ice cream is set and perfectly creamy, it’s ready to serve! Scoop it into bowls or cones and feel free to get creative with toppings. Crushed peanuts, chocolate chips, or drizzles of chocolate syrup can add a delightful crunch and burst of flavor to every scoop. Enjoy the satisfaction of knowing you made this incredible treat right in your own kitchen!
This method is all about simplicity and creativity-don’t hesitate to experiment with different mix-ins or flavors. You can incorporate chocolate chunks, cookie dough, or even swirls of caramel to make this ice cream truly your own. So grab your ingredients and get started on a sweet adventure that showcases your kitchen prowess!
Tips for Achieving the Best Texture Every Time

The secret to achieving a rich and creamy texture in your homemade peanut butter ice cream lies in the careful balance of your ingredients and techniques. Start by ensuring you use a high-fat content for your dairy components. Opt for heavy cream over lighter options like half-and-half or milk; the fat content not only creates a smoother end product but also helps prevent ice crystal formation during freezing. To thicken the mixture, you can even replace a portion of the milk with additional heavy cream, enhancing that luxurious mouthfeel.
When mixing your ingredients, combine the peanut butter with sugar first, achieving a creamy base. This initial mixture forms the foundation of your ice cream, allowing the sugar to dissolve properly and prevent ice granules later. Gradually fold in the heavy cream and milk to keep air bubbles intact. This step is crucial because incorporating too much air can lead to a light and fluffy texture, which may not hold up well as ice cream.
The real magic happens during the freezing process. As mentioned, stir your mixture every 30 minutes for the first few hours. This recurring action breaks up any ice crystals that start to form, subsequently leading to that silky finish we all crave. If you skip this step, you might end up with icy chunks rather than the creamy delight you’re aiming for. For a truly professional touch, let your ice cream sit in the freezer for a couple of hours after the last stir, allowing it to firm up without becoming too hard.
Lastly, don’t shy away from experimenting! You can add a tablespoon or two of vodka or a similar alcohol that won’t freeze. This little trick not only enhances the flavor but also keeps your ice cream scoopable. And when you’re ready to serve, let it sit at room temperature for a few minutes. This will soften the ice cream just enough for that perfect scoop. Enjoy your homemade creation and the joyful process of perfecting your peanut butter ice cream!
Creative Mix-Ins to Elevate Your Ice Cream
When it comes to homemade peanut butter ice cream, the possibilities for mix-ins are virtually endless, and they can take your creamy creation from good to extraordinary. Adding different textures and flavors not only enhances the overall experience but also allows you to infuse your own personality into your ice cream. With just a few simple additions, you can customize a classic treat into something uniquely yours!
Start by considering what textures you enjoy. Here are some delightful options to mix in:
- Chocolate Chips or Chunks: Whether you prefer dark, milk, or even white chocolate, chunks of chocolate bring a rich contrast to the nutty flavor of peanut butter.
- Crushed Cookies: Oreos, gingersnaps, or graham crackers add a delightful crunch. Just crush them coarsely and fold them in to maintain some texture.
- Chopped Nuts: For an extra crunch and nutty flavor, mix in pieces of almonds, walnuts, or even more peanuts. These can enhance the peanut flavor while adding a satisfying bite.
- Fruits: Sliced bananas or swirls of strawberry or raspberry puree can provide a fresh twist and natural sweetness that complements the creamy base.
Adding your mix-ins is easy! Just fold them into the ice cream base during the last few minutes of mixing before you start the freezing process. This approach helps ensure that the mix-ins are evenly distributed throughout the ice cream without breaking them down too much.
It’s also fun to explore flavor combinations. How about experimenting with salt as a flavor enhancer? A pinch of sea salt can amplify the richness of your peanut butter and contrast beautifully with sweetness. Or try swirling in caramel sauce or a fudge ripple for a decadent effect that’s sure to impress.
Don’t hesitate to think outside the box-what about a drizzle of honey or a splash of maple syrup? Adding unexpected elements can elevate your ice cream, making it a memorable treat that friends and family will rave about. Embrace your creativity and pamper your taste buds with fantastic mix-ins for a truly delightful homemade peanut butter ice cream experience!
Delicious Variations: Chocolate, Banana, and More
Imagine diving into a rich, creamy bowl of peanut butter ice cream, with exciting bursts of flavor that keep every bite interesting. This homemade delight can take on so many delicious forms by incorporating various ingredients, allowing you to customize it to your heart’s desire. Whether you’re a chocolate lover, a fan of fruity flavors, or someone who enjoys a bit of crunch, there’s a variation here that will tickle your taste buds!
For a classic combination, chocolate and peanut butter are a match made in dessert heaven. You can add chocolate chips or chocolate chunks right into the ice cream mixture before freezing. Not only does the chocolate add a rich flavor, but its creamy texture contrasts beautifully with the smoothness of the peanut butter. For an extra indulgent treat, consider creating a chocolate swirl by drizzling melted chocolate into the ice cream during the last stages of mixing. This will make for gorgeous ribbons of goodness!
If you’re craving a fruity twist, mashed bananas or strawberry puree are fantastic additions. Incorporating banana gives your ice cream a creamy texture and natural sweetness, as well as a delightful potassium boost. You can even slice fresh bananas and fold them in before freezing to enjoy pockets of sweetness throughout your ice cream. Swirling in strawberry or raspberry puree not only infuses vibrant color but also brings a fresh tartness that pairs perfectly with the nutty flavor of peanut butter.
For a bit of crunch, throw in some crushed cookies or chopped nuts. Crushed Oreos create a cookies and cream vibe that complements the peanut butter beautifully, while chopped peanuts or nuts like almonds and walnuts can amplify the nutty flavor and add texture.
Each of these variations can unlock new taste experiences and extend the life of your homemade treat. So grab your ingredients and get creative! Mix and match flavors to find your perfect scoop, and enjoy the magic of homemade peanut butter ice cream that truly reflects your unique palate.
How to Store Your Peanut Butter Ice Cream
To preserve the creamy goodness of your homemade peanut butter ice cream, proper storage is key. After you’ve mastered the art of making your ice cream without a machine, it’s essential to keep it in top shape so it delights your taste buds for weeks to come. Start by transferring your ice cream into an airtight container, preferably one that’s shallow rather than tall. A shallower container allows the ice cream to freeze more evenly and makes it easier to scoop later on.
Before sealing it up, smooth the surface of your ice cream with a spatula, then place a sheet of plastic wrap directly on the surface. This simple step helps prevent ice crystals from forming, which can occur if air reaches the surface. Finally, cover the container with its lid and store it in the coldest part of your freezer-typically not the door, as it’s subject to temperature fluctuations.
When you’re ready to enjoy your sweet creation, let the ice cream sit at room temperature for about 5 to 10 minutes before scooping. This will soften it just enough for a perfect scoop without losing its intended texture. Homemade peanut butter ice cream can last in the freezer for about two weeks, but trust me, it won’t be around that long with how delicious it is!
If you find yourself with leftovers, consider labeling your container with the date-this handy trick will help you keep track of its freshness. Embrace the joy of making and storing homemade ice cream; with these easy steps, you can ensure every scoop is as delightful as the first!
Serving Suggestions: Toppings and Pairings
Peanut butter ice cream is a delightful treat on its own, but when it comes to serving, the options to elevate your dessert experience are endless. Imagine scooping into that rich, creamy goodness and discovering layers of textures and flavors that complement the nutty richness of the peanut butter. Whether you prefer something simple or want to impress at a gathering, the right toppings and pairings can transform your homemade creation into a gourmet experience.
Start with classic toppings that enhance the flavor while adding a delightful crunch. Chopped peanuts are a natural choice; they amplify that peanuty flavor and provide a satisfying bite. For a decadent touch, drizzle some warm chocolate sauce over the scoops. The contrast of hot and cold is purely heavenly. You might also consider a scatter of mini chocolate chips or toasted coconut flakes for an additional textural component that feels indulgent yet approachable.
If you’re aiming for a bit of whimsy, how about assembling a sundae? Start with a generous scoop of your peanut butter ice cream, then layer it with {strong}whipped cream, sprinkles, and perhaps even a cherry on top. Want to incorporate fruit? Slices of banana or strawberries match perfectly with the creaminess of the peanut butter and add a refreshing contrast. For a totally unique twist, serve the ice cream sandwiched between chocolate chip cookies for a nostalgic treat that harks back to childhood but is just as enjoyable at any age.
Lastly, don’t forget the drinks! A rich peanut butter shake can be made by simply blending the ice cream with a bit of milk and additional chocolate syrup for a decadent beverage option. Serve in a tall glass, topped with whipped cream and perhaps a sprinkle of crushed nuts for garnish. Whatever you choose, these serving suggestions are sure to enhance your homemade peanut butter ice cream and provide a deliciously satisfying experience for you and your guests!
Nutritious Alternatives for Health-Conscious Ice Cream Lovers
Indulging in homemade peanut butter ice cream doesn’t have to come with a side of guilt, especially when you’re armed with a few nutritious alternatives tailored for health-conscious ice cream lovers. By making thoughtful substitutions, you can enjoy a creamy, rich dessert that aligns better with your dietary preferences and goals.
One simple switch is to use natural peanut butter instead of conventional brands. Look for options with minimal ingredients-just peanuts and possibly a pinch of salt. This way, you avoid the added sugars and oils often found in commercial varieties. For a lighter base, consider using Greek yogurt instead of heavy cream or half-and-half. It not only imparts a creamy texture but is also packed with protein and probiotics. A combination of Greek yogurt and a touch of honey or maple syrup can provide the sweetness you desire without the extra calories.
When it comes to sweetening your ice cream, bananas offer a fantastic alternative. Freezing ripe bananas and blending them into your ice cream mixture can create a naturally sweet and creamy texture. If you’re looking for a lower-calorie sweetener, consider options like stevia or monk fruit sweetener. Both are natural and won’t spike your blood sugar, making them great for those maintaining a healthier lifestyle.
If you’re concerned about dairy, don’t fret; there are delicious, creamy options available! Use coconut cream or almond milk as a base for a delightful dairy-free version. Coconut cream will bring a rich texture similar to traditional ice creams, while almond milk will keep it light and refreshing. Add in your choice of plant-based peanut butter for that nutty punch.
With these easy modifications, you can whip up a bowl of peanut butter ice cream that not only satisfies your sweet tooth but also fulfills your conscious eating aims. Experimenting in the kitchen is part of the fun-play with these alternatives and find the combination that works best for your taste and health goals!
Troubleshooting Common Mistakes in Ice Cream Making
Making homemade peanut butter ice cream is a delightful adventure, but even the best recipes can come with their share of hiccups. Whether you’re a seasoned pro or a newbie, being aware of common mistakes can ensure your ice cream turns out creamy and delicious every time.
One frequent issue is ice crystals forming in your ice cream. This can happen if the mixture isn’t frozen quickly enough or if it’s not mixed well before freezing. To avoid this, ensure that your peanut butter and other ingredients are well combined and smooth before you freeze. Consider chilling your mixture in the fridge for about 30 minutes before transferring it to the freezer. This quick chill can help it solidify faster, reducing ice crystal formation.
Another common mistake is not incorporating enough air into the mixture. Homemade ice cream should be light and fluffy, and whipping your ingredients plays a crucial role in this. When making your peanut butter ice cream, take a moment to whisk or blend your mixture thoroughly. This aeration helps create a creamy texture that feels indulgent. If you find that your ice cream is too dense, try folding in some whipped cream or whipped egg whites to lighten it up.
Lastly, be mindful of the temperature of your ice cream before serving. If it’s too hard, you might end up with a scoop that’s more like a rock than a smooth treat. Allow your ice cream to soften at room temperature for about 10-15 minutes before serving. This extra time helps soften the ice cream, making it easier to scoop and giving you that perfect, creamy texture that everyone loves.
With these tips at your side, you can confidently tackle any hurdles in your peanut butter ice cream-making journey. Embrace the process, learn from any missteps, and enjoy your delicious homemade treats!
Exploring Dairy-Free Options for Peanut Butter Ice Cream
Creating a delicious peanut butter ice cream doesn’t have to involve dairy products. Whether you’re lactose intolerant, following a vegan diet, or simply looking to lighten things up, there are plenty of exciting options to explore. In fact, dairy-free alternatives can provide just as much creamy satisfaction while delivering that rich peanut buttery flavor we all love.
Start by selecting a base for your dairy-free ice cream. Coconut milk is a superstar in the dairy-free world, offering a velvety texture and slight sweetness. Almond milk is a lighter choice, but it may require a bit more sweetener or ingredients to keep it creamy. Other great options include cashew milk and oat milk, both of which can produce a rich and satisfying blend. When choosing a milk alternative, look for unsweetened versions to control the sweetness level in your final product.
Once you’ve selected your base, the process is relatively simple. Combine the dairy-free milk alternative with your favorite peanut butter (creamy or chunky, depending on your texture preference), a sweetener like maple syrup or agave nectar, and a splash of vanilla extract for added flavor. Here’s a quick example recipe to guide you through:
Quick Dairy-Free Peanut Butter Ice Cream Recipe
- 1 can (13.5 oz) full-fat coconut milk
- 1/2 cup peanut butter
- 1/4 cup maple syrup (adjust to taste)
- 1 tsp vanilla extract
Blend these ingredients until smooth, pour them into a container, and freeze. Stir it every 30 minutes for the first couple of hours to help incorporate air and prevent ice crystals from forming, making it creamy instead of icy.
Dairy-free doesn’t mean you have to skimp on flavor or richness. Feel free to fold in extras like dairy-free chocolate chips or chunks of dairy-free cookies for a delightful twist. The world of dairy-free peanut butter ice cream is ripe for experimentation, so mix and match your favorite additions to create something uniquely yours! Enjoy your creamy, dreamy treat guilt-free.
Ice Cream Serving Ideas for Summer Gatherings
When summer rolls around, there’s nothing quite as satisfying as serving a refreshing scoop of homemade peanut butter ice cream. It’s creamy, rich, and absolutely delightful, especially when shared with friends and family during cookouts or casual gatherings. To make your ice cream presentation extra special, consider a few fun and creative serving ideas that will elevate this treat and make it a memorable centerpiece.
Start with classic ice cream cones, but don’t stop there! Make ice cream sandwiches by slathering peanut butter between two cookies. Chocolate chip or oatmeal cookies work beautifully, adding a chewy texture that complements the smooth ice cream. For an extra layer of flavor, dip the edges of the sandwiches in crushed nuts or chocolate chips.
Another fun option is to create an ice cream bar! Set up a table with your homemade peanut butter ice cream in a large bowl and a variety of toppings. Include options like chopped Reese’s cups, crushed graham crackers, mini marshmallows, and chocolate syrup. Provide a mix of cones, cups, and bowls so guests can customize their treats exactly how they like them. This interactive element not only enhances the experience but also caters to different preferences, making it a hit at any gathering.
For a sophisticated twist, try serving your ice cream in cocktail glasses with a drizzle of caramel sauce and a sprinkle of sea salt on top. This elevated presentation turns your simple ice cream into a show-stopping dessert. You can also pair it with fresh fruit, such as sliced bananas or strawberries, to add a refreshing contrast and vibrant color to your dessert spread.
Lastly, don’t forget about the drinks! Peanut butter ice cream pairs wonderfully with a tall glass of chilled milk or even as a topping for milkshakes. Blend a scoop of your delicious ice cream with some chocolate milk for a rich peanut butter chocolate shake that will wow your guests.
With these serving ideas, your peanut butter ice cream will not just be a dessert, but a delightful experience that everyone at your summer gathering will remember and savor. Enjoy the process of creating and sharing this delicious treat!
Faq
Q: How long does it take to make no-churn peanut butter ice cream?
A: Making no-churn peanut butter ice cream typically takes about 15 minutes of prep time. After mixing the ingredients, allow it to freeze for at least 4-6 hours to achieve the desired texture. The result is a creamy treat without the fuss of an ice cream maker.
Q: Can I use natural peanut butter for this ice cream recipe?
A: Yes, you can use natural peanut butter! Just keep in mind that it may create a slightly different texture due to its consistency. For a creamier result, opt for creamy varieties without added sugar or oil to ensure the best flavor balance in your no-churn ice cream.
Q: What can I add to my peanut butter ice cream for extra flavor?
A: Consider adding chocolate chips, crushed cookies, or a swirl of caramel sauce for added flavor and texture. These creative mix-ins can elevate your peanut butter ice cream, making it even more indulgent! Check the “Creative Mix-Ins” section for more suggestions.
Q: How do I keep my homemade peanut butter ice cream from freezing too hard?
A: To prevent your ice cream from becoming too hard, add a splash of vodka or corn syrup, which helps keep it soft. Additionally, serve it for about 10 minutes at room temperature before scooping to achieve the perfect creamy consistency.
Q: Is it possible to make dairy-free peanut butter ice cream?
A: Absolutely! You can substitute dairy ingredients with coconut milk, almond milk, or any non-dairy milk of your choice. Follow the same no-churn process for a delicious, dairy-free version. Explore the “Exploring Dairy-Free Options” section for more tips.
Q: How can I make my no-churn peanut butter ice cream healthier?
A: To create a healthier version, use reduced-fat or natural peanut butter and substitute regular sugar with options like honey or maple syrup. Using Greek yogurt in place of heavy cream can also reduce calories while maintaining creaminess. Check the “Nutritious Alternatives” section for more ideas.
Q: Can I make peanut butter ice cream without sweeteners?
A: Yes, you can make peanut butter ice cream without sweeteners by using ripe bananas for natural sweetness. Blend frozen banana chunks with peanut butter to create a creamy, sweet ice cream without added sugars. This can be found in the variations of the recipe.
Q: How should I store leftover peanut butter ice cream?
A: Store leftover peanut butter ice cream in an airtight container in the freezer. To maintain the best texture, cover the surface with plastic wrap before sealing the lid. It can last up to 2 weeks but is best enjoyed fresh. Check “How to Store Your Peanut Butter Ice Cream” for more details.
Future Outlook
Now that you have your creamy, indulgent peanut butter ice cream ready to enjoy, don’t wait too long-scoop it out and treat yourself today! This no-machine recipe is not only easy but also customizable, so feel free to experiment with mix-ins like chocolate chips or banana slices to make it your own.
If you loved this peanut butter ice cream, check out our other delightful recipes, like the Best Homemade Chocolate Chip Cookies and Decadent No-Bake Cheesecake, for more sweet treats to satisfy your cravings. Don’t forget to share your creations in the comments below and tag us on social media-we love seeing your home kitchen victories!
Ready to dive deeper? Sign up for our newsletter to receive more easy, no-fuss recipes straight to your inbox. Now, go on and unleash your inner ice cream maker; you’ve got this!


