When it comes to dessert, who can resist a creamy, delicious cheesecake? Now, imagine enjoying that classic treat without turning on the oven! No Bake Mini Cheesecakes are the perfect solution for those who crave something sweet but want to keep things simple. These tiny, tempting bites are not only easy to make but also incredibly versatile, allowing you to customize flavors for any occasion-be it a birthday party, a casual gathering, or a festive holiday celebration. Plus, they’re kid-friendly and can be whipped up quickly, making dessert preparation a breeze. Let your creativity shine as you stack them high with toppings or mix in your favorite flavors. Ready to delight your guests and impress your taste buds? Dive into the world of no bake cheesecakes and discover how these little treats can make any event unforgettable!
Perfectly Simple No Bake Cheesecake Recipe
Creating a no-bake cheesecake is a delightful journey that transforms simple ingredients into a creamy, decadent dessert without the need for an oven. It’s perfect for those who want to impress guests with minimal fuss. To make a perfectly simple no-bake cheesecake, you’ll need just a few key ingredients and a bit of patience for it to set!
To start, gather the essentials: you’ll need cream cheese, powdered sugar, heavy whipping cream, and a graham cracker crust. Mixing these ingredients creates a rich and fluffy filling that’s the star of your cheesecake. Here’s a basic recipe to get you going:
- Ingredients:
- 1 ½ cups of crushed graham crackers
- ½ cup unsalted butter, melted
- 2 (8 oz) packages cream cheese, softened
- ¾ cup powdered sugar
- 1 teaspoon vanilla extract
- 1 cup heavy whipping cream
Simply combine the crushed graham crackers with melted butter, press the mixture into the bottom of a springform pan, and chill it for about 30 minutes. Meanwhile, beat the cream cheese with powdered sugar and vanilla until smooth. In a separate bowl, whip the heavy cream until stiff peaks form, then gently fold it into the cream cheese mixture. Pour this velvety filling over the crust and refrigerate for at least four hours, or until fully set.
For a fun twist, consider dividing your filling to create mini cheesecakes in cupcake liners, which are perfect for parties. Add different flavors like lemon zest or chocolate to your base mixture for variations that cater to all taste preferences. The beauty of no-bake cheesecakes lies in their versatility-each small bite can be a new flavor experience!
Essential Ingredients for Mini Cheesecakes
Creating mini cheesecakes is a delightful and rewarding endeavor, especially considering how straightforward the essential ingredients are. These tiny treats are not only a breeze to prepare but are also incredibly versatile, making them a favorite for any gathering or celebration. To ensure your mini cheesecakes are irresistibly creamy and satisfying, you’ll want to gather a few key ingredients.
First and foremost, cream cheese is the star of the show. It provides that signature smooth and rich texture that makes cheesecakes so indulgent. When selecting cream cheese, opt for a full-fat variety for the best results. You’ll need about two 8-ounce packages for most mini cheesecake recipes.
Next up, powdered sugar serves to sweeten the filling without adding unwanted grittiness. About three-quarters of a cup will do the trick, but feel free to adjust based on your personal sweetness preference.
Heavy whipping cream is essential for creating that light and airy feel, so make sure to have a cup ready to whip until peaks form. This not only enhances the texture but also contributes to the cheesecakes’ overall fluffiness.
Don’t forget about the graham cracker crust-a simple combination of crushed graham crackers and melted butter makes for a delicious base. You’ll typically need 1.5 cups of crushed graham crackers combined with half a cup of melted unsalted butter to bind everything together. For added flavor, consider mixing in a teaspoon of vanilla extract.
You can experiment with flavor enhancements too. Incorporate zest from citrus fruits like lemons or limes for a fresh twist, or fold in some melted chocolate for a decadent variant. The beauty of these mini desserts lies not just in their simplicity but also in their adaptability, allowing you to let your creativity shine through with each batch!
Quick Tips for Perfectly Creamy Texture
To achieve that dreamy, creamy texture that makes mini cheesecakes so irresistible, a few simple techniques can make all the difference. The key is to ensure all your ingredients are at the right temperature and to integrate them properly. Start with the cream cheese. It should be at room temperature before you begin mixing; this allows it to blend smoothly with the other ingredients, preventing any clumps. If it’s too cold, you’ll end up with a lumpy filling that’s hardly inviting.
When you’re ready to mix, use an electric mixer rather than a whisk for the fluffiest results. Start by beating the cream cheese alone until it’s light and smooth before gradually adding the powdered sugar. This method aerates the mixture, forming tiny bubbles that create a light and airy texture. Once combined, add the heavy whipping cream. It’s important to whip the cream until stiff peaks form before folding it into the cheesecake mixture. This not only adds volume but also enhances the overall creaminess.
Another tip is to incorporate a splash of lemon juice or vanilla extract into your filling. This not only adds flavor but can also help to balance the richness of the cream cheese. Finally, chill your mini cheesecakes for sufficient time-ideally at least 4 hours or overnight. The cooling process allows the flavors to meld beautifully and the texture to set up perfectly. Each bite will then be a delightful, rich, and creamy experience that’s simply hard to resist!
Creative Flavor Combinations to Try
Creating mini cheesecakes opens up a world of delightful flavors to explore-each tiny bite can be a burst of creativity! By thinking beyond the classic vanilla or chocolate, you can craft unique combinations that will surprise and delight your guests. Imagine hosting a gathering where every cheesecake flavor tells a different story, from fruity to savory, just waiting to be savored!
One popular twist is the fruit-infused mini cheesecake. Blend in pureed strawberries, blueberries, or raspberries into your cream cheese mixture for that perfect sweet and tangy contrast. For an added touch, consider topping these with a fresh fruit topping or a homemade fruit compote. Citrus flavors, such as lemon or lime, can also elevate your cheesecakes-try using fresh zest or juice to introduce a refreshing zing that cuts through the richness of the cream cheese.
Decadent Options
Looking for something indulgent? Try a chocolate hazelnut combination by mixing in chocolate hazelnut spread with your cream cheese. Top with crushed hazelnuts and a drizzle of chocolate sauce for a truly decadent experience. Alternatively, a caramel pretzel cheesecake combines the sweetness of caramel with the salty crunch of pretzels. Blend crushed pretzels into your crust for added texture, and drizzle caramel on top before serving.
Exploring Unique Flavors
Don’t shy away from adventurous combinations! Consider a matcha green tea cheesecake for a beautiful and unique flavor profile. The earthy tones of matcha not only add an interesting taste but also a vibrant green color to your desserts. For a touch of the exotic, a coconut mango mini cheesecake can be made by incorporating coconut cream and topped with a slice of fresh mango or a sprinkle of toasted coconut flakes.
Incorporating these creative flavor combinations into your no-bake mini cheesecakes not only adds variety but also makes them suitable for any event-whether it’s a birthday party, a holiday gathering, or simply a treat for yourself. Remember, the sky’s the limit when it comes to flavor, so don’t hesitate to experiment and find your perfect combinations!
Decorating Ideas to Make Them Pop
Creating a visually stunning mini cheesecake isn’t just about taste; it’s also about making each tiny dessert a work of art that catches the eye. Whether you’re preparing for a special event or just wanting to impress during a casual gathering, some simple yet effective decorating ideas can elevate your no-bake mini cheesecakes and leave your guests in awe.
Start with the base of your cheesecake: each mini cake can be topped with a delightful swirl of whipped cream. Use a piping bag to create elegant peaks or simple dollops, which adds a touch of sophistication. For an extra pop of color and flavor, consider adding a drizzle of fruit sauce-think raspberry, blueberry, or even chocolate-over the whipped cream. This not only enhances the presentation but also complements the flavor profile of your cheesecake.
Next, don’t underestimate the power of garnishes! Fresh berries like strawberries, raspberries, or blueberries make for beautiful toppings. You can place them directly atop the whipped cream or create a small berry compote to share the spotlight. Edible flowers, such as pansies or nasturtiums, can also make for stunning decorations, transforming a simple cheesecake into a garden of vibrant colors.
Textures Matter
Introduce additional textures to your mini cheesecakes to create visual interest. Crushed nuts, such as almonds or pistachios, sprinkled on top can add crunch and a lovely green touch. You could also use cookie crumbs-graham cracker, chocolate wafer, or even Oreos-to reinforce the cheesecake base while providing a dynamic look. Consider layering these elements by adding a sprinkle of cookies beneath the whipped cream to create a beautiful contrast.
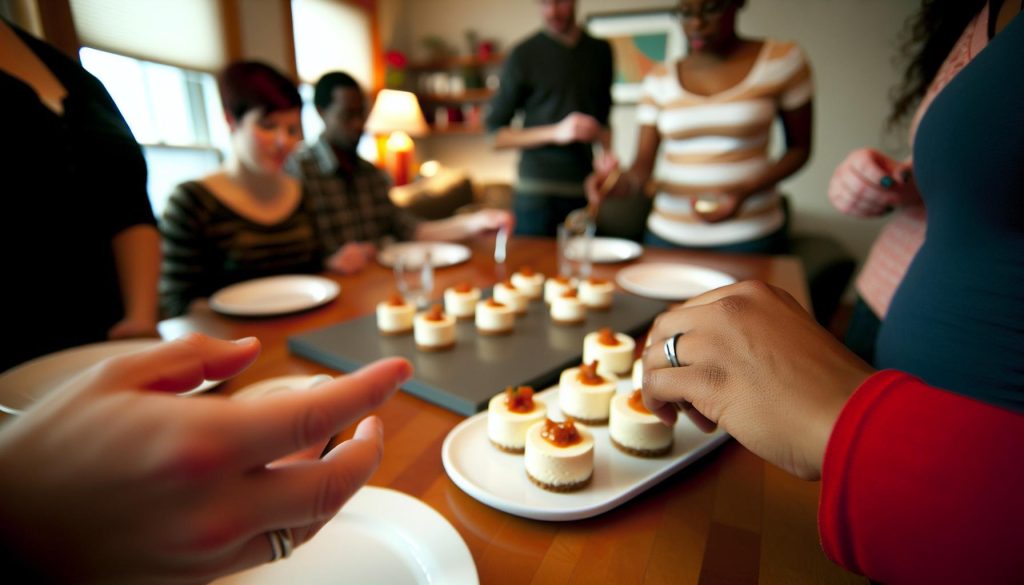
Lastly, presentation is key. Arrange your mini cheesecakes on a tiered cake stand for a stunning focal point on your dessert table. Alternatively, use decorative plates or rustic wooden boards to showcase the cheesecakes alongside complementary treats like small fruit cups or chocolate truffles. This not only draws attention to your delicious creations but also sets the mood for a delightful dessert experience.
With these decorating ideas, you can easily transform your no-bake mini cheesecakes into beautiful, tempting bites that will surely impress your guests while maintaining the simplicity and joy of homemade baking. Happy decorating!
How to Serve and Present Mini Cheesecakes
When it’s time to serve your beautiful no-bake mini cheesecakes, the presentation can elevate their appeal, turning them into the star of your dessert table. These tiny treats are not only delicious but also versatile, making them perfect for any event, from festive occasions to casual get-togethers. A well-thought-out presentation can entice your guests even before they take their first bite.
To start, consider the serving vessel. Mini cheesecakes look stunning in clear cups or jars, allowing your guests to see the layers and textures that make each bite special. Alternatively, placing them on a decorative platter is a great way to invite sharing and conversation. If you’re aiming for an elegant touch, opt for a tiered cake stand; it not only saves space but also creates a delightful visual height contrast. Don’t forget to use doilies or colorful napkins beneath your cheesecakes to add an extra layer of charm.
As you set the stage for these delicate bites, think about complementary items to place alongside them. Fresh fruits, like sliced strawberries or raspberries, can add a pop of color and freshness to the overall display. Consider including small dessert forks or spoons for easy serving, making it simple for your guests to indulge without fuss. For a personal touch, label each cheesecake flavor with charming little flags or tags. This not only enhances the visual appeal but also sparks interest and helps guests remember their favorites!
Lastly, consider the atmosphere you’re aiming to create. Dimmed lights paired with soft music can elevate the entire dining experience, drawing attention to your dessert spread. A well-presented platter of mini cheesecakes, surrounded by thoughtful elements like fresh flowers or themed decor, creates an inviting and festive ambiance. Whether for a holiday party or a casual family gathering, the care you put into serving and presenting these tiny desserts will surely leave a lasting impression and make every occasion feel a little more special.
Storage Solutions for Your Cheesecakes
When it comes to enjoying your no-bake mini cheesecakes, proper storage is essential to maintain their delightful texture and flavor. These tiny treats are perfect for make-ahead desserts, allowing you to prepare them in advance without sacrificing quality.
First off, it’s best to store your cheesecakes in the refrigerator. Keep them covered to prevent any odors from other foods affecting their taste. If you’ve used individual serving cups or jars, simply place them in a container with a tight-fitting lid. This not only keeps them fresh but also makes for easy transportation if you’re headed to a potluck or party. A good rule of thumb is that they can last up to 5 days in the fridge-perfect for snacking anytime!
For longer storage, you can freeze your mini cheesecakes. Just be sure to allow them to set properly first. To freeze, remove them from their serving cups if possible, and wrap them individually in plastic wrap. Then place them in a freezer-safe bag or container. This method helps prevent freezer burn and keeps their flavor intact. They can be frozen for up to 2 months without losing much of their original taste or texture. When you’re ready to enjoy them, simply transfer them to the fridge to thaw overnight.
Remember, if you’ve topped your mini cheesecakes with fresh fruits or delicate decorations right before serving, it’s best to add those just before you plan to serve them. Keeping toppings separate during storage will help maintain their freshness and appearance. Overall, with these simple storage solutions, you can enjoy your homemade mini cheesecakes at your convenience without compromising on flavor or quality!
Scaling Your Recipe for Any Event
Scaling your recipe can transform your no-bake mini cheesecakes into the perfect dessert for any gathering, big or small. Whether you’re prepping for an intimate dinner party or a lavish holiday feast, these delightful treats can easily be adjusted to suit your needs. The key lies in understanding your ingredient ratios and determining how many servings you’d like to create.
Adjusting Ingredients for Smaller or Larger Batches
To scale your mini cheesecakes, start by considering how many servings you want. If you’re making a single batch that serves four, simply multiply each ingredient by two or three for larger groups. Here’s a quick reference guide:
- If one batch = 4 cheesecakes
- Double for 8 cheesecakes
- Triple for 12 cheesecakes
Keep the base of cream cheese and whipped cream in perfect balance to maintain that luscious, creamy texture-just remember to adjust your crust ingredients accordingly. For instance, if the base recipe calls for 8 ounces of cream cheese, you’ll use 16 ounces for double the batch. Adapting your crust is also essential; you can calculate roughly one ounce of cream cheese per mini cheesecake and adjust your graham cracker crust mixture appropriately.
Utilizing Different Serving Sizes
Another fun way to scale is by varying the serving size. Instead of traditional cups, try shot glasses for small bites or 4-ounce mason jars for a more rustic presentation. The beauty of these mini cheesecakes is their versatility! A single recipe might fill four cups but could yield eight shot glasses or two jars, which can cater to different preferences at the same event.
Always keep in mind that using multiple serving sizes might mean different setting times in the refrigerator, so adjust accordingly. For example, shot glasses might need a bit less chilling time than larger jars, so keep an eye on them as they set.
Planning for Any Occasion
Whether it’s a birthday party or a holiday gathering, consider the theme when scaling your recipe. You could create a cohesive dessert table by offering varied flavors, such as chocolate, vanilla, or lemon, each in its own size. By mixing flavors and formats, you create an appealing spread that invites guests to sample more than one!
Scaling your mini cheesecakes to fit any occasion not only makes entertaining effortless but also adds a personal touch to your gatherings. Dive into your next event with these tiny, tempting treats, and you’ll be guaranteed to impress your friends and family with your delicious creations!
Common Mistakes to Avoid When Making Cheesecakes
Creating delightful no-bake mini cheesecakes should be a joyful experience, but there are a few common pitfalls you might encounter. Avoiding these can make a world of difference in achieving that perfect creamy texture and flavor that you, and your guests, will love. Here are some key mistakes to steer clear of as you embark on your cheesecake journey!
Often, home bakers forget to properly soften the cream cheese before mixing. Using cold cream cheese can result in lumps and a gritty texture, which is not what we want in a decadent cheesecake. To ensure a smooth consistency, let the cream cheese sit at room temperature for about 30 minutes. If you’re short on time, you can microwave it in short bursts (about 10-15 seconds), but be careful not to overheat it.
Another common issue is skimping on the mixing time. While you might be eager to blend everything quickly, taking the time to whip the cream cheese and other ingredients thoroughly is crucial. This step integrates air into the mixture, adding that lightness we adore in no-bake cheesecakes. Aim for about 2-3 minutes of mixing on medium speed until everything is well combined and creamy.
It’s also easy to overlook chilling time. Patience is key when letting your mini cheesecakes set in the fridge. If you don’t give them enough time, they can end up soft and unstructured, making them difficult to serve. A cooling period of at least 4-6 hours is ideal, with overnight being the best option for the ultimate firmness and flavor development.
Lastly, be wary of overly sweet crusts. While a touch of sweetness enhances the flavor, too much sugar can overpower your cheesecakes. Stick to a balanced ratio; typically, about 1/4 cup of sugar for each cup of graham cracker crumbs works just right. Additionally, remember to press the crust firmly into your serving dishes to create a solid base for your cheesecakes.
By avoiding these common mistakes, you’ll create no-bake mini cheesecakes that are not only visually appealing but also a delicious hit at any event! Enjoy the process and celebrate your masterpiece!
Taste Testing: Pairing Options and Serving Suggestions
Mini cheesecakes are not just adorable; they are also incredibly versatile when it comes to flavors and pairings. The key to elevating these tiny delights is to consider complementary textures and tastes that can bring out the best in your no-bake creation. Imagine rich, velvety cheesecake paired with a refreshing fruit topping, or a chocolate-infused base complemented by a drizzle of caramel-endless combinations await!
To start exploring pairing options, think about the flavor profile of your cheesecake filling. For a classic plain cheesecake, think fresh fruits like strawberries, blueberries, or kiwi. Not only do they provide a pop of color, but their natural sweetness and acidity contrast beautifully with the creamy texture. You can even create a fruit compote by gently cooking berries with a bit of sugar to concentrate the flavors. This compote can be made ahead of time and stored in the fridge, ready to spoon over your cheesecakes before serving.
For chocolate lovers, consider adding a layer of chocolate ganache or a sprinkle of crushed cookies on top. Pair your chocolate cheesecake with a scoop of vanilla ice cream or a dollop of whipped cream for a decadent finish. Incorporating flavored extracts like espresso or mint into the cheesecake itself can open up a delightful world of pairing possibilities. A hint of mint and a sprinkle of crushed peppermint on top can make your cheesecake festive and refreshing.
Adding a touch of gourmet to your mini cheesecakes can be as simple as garnishing with edible flowers or a dusting of cocoa powder for an elegant touch. Don’t forget about serving options! Present them on a beautiful platter, and arrange various toppings like nuts, chocolate shavings, or sauces nearby, so guests can customize their own bites. This interactive element adds to the fun and encourages creativity at your gathering.
Finally, consider beverage pairings to enhance the tasting experience. A crisp sparkling wine can be a delightful complement, or opt for a rich coffee if you’re leaning toward chocolate flavors. Enjoying these tiny, tempting bites at any event is about being creative and making them your own. The simplicity and adaptability of no-bake mini cheesecakes mean that there’s no limit to what you can create, making them a hit for any occasion!
Special Dietary Alternatives for Cheesecakes
Creating mini cheesecakes that cater to various dietary needs doesn’t need to be daunting. In fact, no-bake recipes are particularly adaptable, allowing you to swap out standard ingredients for alternatives that maintain the deliciousness of your creations. Whether you’re accommodating gluten-free requirements, dairy allergies, or vegan preferences, there’s a way to make these sweet treats accessible to everyone!
To start, consider using almond flour or gluten-free graham crackers for the crust. Both options provide a delightful base without compromising on flavor. If you want a nut-free option, crushed oats or even coconut will do wonders. When it comes to the cheesecake filling, opt for dairy-free cream cheese or blended silken tofu for a vegan-friendly version. These alternatives can replicate the creamy texture beautifully while keeping the cheesecakes light and luscious.
For a healthier alternative, swap out traditional sugar for natural sweeteners like maple syrup, agave nectar, or even honey if not strictly vegan. These options not only enhance the flavor but also help to create a more wholesome dessert. If you’re looking to cut down on calories, you might also try using Greek yogurt as part of your filling; it adds creaminess with the benefit of extra protein.
Lastly, let’s not forget about flavor! Incorporating pureed fruits like bananas or avocados can add natural sweetness and a unique twist to your mini cheesecakes. Even a sprinkle of cinnamon or vanilla extract can elevate the profile, making your delightful bites irresistible and incredibly satisfying as you cater to all dietary preferences. Enjoy experimenting, and remember that making these treats inclusive is not only thoughtful but can also lead to some wonderfully unique flavor combinations!
Hosting a Mini Cheesecake Party: Step-by-Step Guide
Hosting a mini cheesecake party is a delightful way to bring friends and family together, and the best part is that these tiny treats require minimal effort while offering maximum flavor! No-bake mini cheesecakes are not only scrumptious but also incredibly versatile, allowing you to create a beautiful spread that caters to various tastes and dietary needs. Here’s how to plan a fun and successful mini cheesecake gathering.
Start by making a list of cheesecake flavors that excite you. Classic options like vanilla, chocolate, and strawberry will always be crowd-pleasers, but don’t hesitate to experiment with creative variations like matcha, salted caramel, or even key lime. Prepare your no-bake mini cheesecakes in advance-ideally a day or two before the event. This will allow them to set properly in the fridge. Use a muffin tin or mini cheesecake pan for perfect portion sizes; lining the compartments with cupcake liners can make for easy removal and serving.
Setting Up Your Cheesecake Station
Create an inviting dessert table that showcases your mini cheesecakes. Arrange the different flavors on tiered stands for a visually appealing display. You can also include labels next to each flavor to help guests choose their favorites. Enhance the atmosphere by adding some simple decorations, like fresh flowers or colorful napkins that match the theme of your party.
To add a fun element, set up a DIY topping bar where guests can customize their cheesecakes. Offer an array of toppings such as fresh fruits, chocolate shavings, caramel sauce, crushed cookies, and whipped cream. This interactive experience not only lets everyone personalize their desserts but also sparks some creativity!
Serving Suggestions
When it’s time to serve, consider using small dessert plates or even mini forks to make the experience feel special. For beverages, pair your cheesecake bites with coffee, tea, or a fun punch to complement the flavors. If your gathering extends into the evening, a dessert wine or champagne could elevate the occasion even more.
Finally, remember to capture the moments! Set up a photo area with props where guests can take fun pictures with their mini cheesecakes. This not only creates memories but also makes for great social media posts. By the end of the evening, you’ll have delighted guests and an abundance of scrumptious bites-all thanks to your thoughtful planning and creativity!
Q&A
Q: What are the best toppings for no bake mini cheesecakes?
A: Best toppings for no bake mini cheesecakes include fresh fruit, whipped cream, chocolate ganache, or caramel sauce. You can also experiment with crushed cookies or sprinkles for added texture. These toppings enhance flavor and presentation, making your mini cheesecakes visually appealing for any event.
Q: How long do no bake mini cheesecakes need to set?
A: No bake mini cheesecakes typically need to set for at least 4 hours in the refrigerator. For optimal texture, overnight refrigeration is recommended. Allowing sufficient chilling time ensures they achieve the perfect creamy consistency and firm structure.
Q: Can you freeze no bake mini cheesecakes?
A: Yes, you can freeze no bake mini cheesecakes. To freeze, wrap them in plastic wrap and store in an airtight container. They can be frozen for up to 2 months. Simply thaw them in the refrigerator for a few hours before serving to maintain their creamy texture.
Q: How do you make mini cheesecakes without a springform pan?
A: You can easily make mini cheesecakes without a springform pan by using muffin tins lined with paper liners. This method allows for easy removal after chilling and helps maintain their shape. Just fill each liner with the cheesecake mixture and follow your recipe as usual.
Q: What flavors can I use for no bake mini cheesecakes?
A: Flavors for no bake mini cheesecakes are endless! Popular options include classic vanilla, chocolate, strawberry, lemon, and even matcha. For unique twists, try adding extracts like almond or coconut, or incorporate different flavored yogurts into the mix.
Q: Are no bake mini cheesecakes gluten-free?
A: No bake mini cheesecakes can be made gluten-free. Use gluten-free graham crackers or any suitable cookie alternative for the crust. Always check your other ingredients, such as the cream cheese and toppings, to ensure they are gluten-free as well.
Q: How can I make no bake mini cheesecakes healthier?
A: To make no bake mini cheesecakes healthier, consider using Greek yogurt instead of cream cheese, and opt for a nut-based crust instead of a cookie crust. You can also sweeten with honey or maple syrup instead of sugar, and top with fresh fruit for added nutrition.
Q: How do I transport no bake mini cheesecakes for events?
A: To safely transport no bake mini cheesecakes, use a sturdy container with a lid. Arrange them securely so they do not shift, and place a piece of parchment paper between layers if stacking. Keep them chilled in a cooler or insulated bag until ready to serve.
To Wrap It Up
Now that you’ve learned how to create delightful No Bake Mini Cheesecakes, it’s time to get into your kitchen and whip up these irresistible treats for your next gathering. With just a few simple ingredients and minimal effort, you’ll impress your guests with these tiny, tantalizing bites. Don’t forget to experiment with flavors and toppings to make them uniquely yours!
If you loved this recipe, why not explore more dessert ideas? Check out our guide on Classic Cheesecakes for timeless favorites or dive into The Best New York-Style Cheesecake for that quintessential experience. Sign up for our newsletter to keep your kitchen adventures going and receive tips straight to your inbox. Happy baking, and we can’t wait to see your mini cheesecake creations!


