Did you know that making your own cultured butter can elevate your everyday meals into something extraordinary? With just a few simple ingredients and some patience, you can create a rich, tangy spread that’s bursting with flavor. Imagine slathering this decadent butter on warm bread or using it to enhance your favorite dishes-it’s a game changer!
Crafting your own cultured butter not only allows you to control the ingredients but also opens the door to a world of culinary creativity. Whether you’re a seasoned cook or just starting out, this process is surprisingly accessible. You don’t need fancy equipment or gourmet skills-just some heavy cream and a bit of time to let the magic happen. As you follow along, you’ll discover how easy it is to create this delightful spread in your kitchen. So grab your cream, and let’s dive into the delicious journey of homemade cultured butter!
Choosing the Right Ingredients for Cultured Butter

When delving into the delightful world of making cultured butter, the ingredients you choose will truly define the flavor and texture of your final product. For a rich, tangy homemade spread, starting with high-quality heavy cream is crucial. Aim for at least 36% butterfat content to achieve that luxurious, creamy consistency that melts in your mouth. Look for products labeled as “heavy whipping cream,” preferably organic and free from additives. This ensures you’re working with a pure base, which is fundamental in making exceptional butter.
Another key ingredient is the dairy culture. You can elevate your butter’s taste by adding a small amount of live dairy culture. This could be plain yogurt, cultured buttermilk, crème fraîche, or even sour cream. Adding about 2 tablespoons of cultured buttermilk to a pint of cream, for instance, introduces the necessary bacteria that will encourage fermentation and enhance flavors. The choice of culture impacts not just the tanginess but also the complexity of your butter. If you want a more nuanced flavor, experiment with different types of cultures or even blends of them.
It’s also essential to consider salt. While you can make unsalted cultured butter, incorporating a pinch of salt-like kosher or sea salt-after the churning process can enhance the natural flavors and help preserve the butter. Starting with just ¼ teaspoon and adjusting to taste is a good rule of thumb.
In summary, sourcing high-quality ingredients is the first step to ensuring your cultured butter is as delicious and vibrant as possible. With careful selection and the right proportions, you’ll set the stage for a rich and tangy homemade butter that you can be proud of. So, ready your ingredients, and let’s transform your kitchen into a haven of creamy goodness!
Step-by-Step Process to Make Cultured Butter

Crafting your own cultured butter is not only wonderfully rewarding but also surprisingly simple, letting you indulge in a rich, tangy spread that elevates any dish. The entire process can be broken down into a few straightforward steps, ideally suited for both novice cooks and seasoned home chefs eager to experiment.
Start by gathering your ingredients: a pint of high-quality heavy cream and about 2 tablespoons of your chosen dairy culture, such as plain yogurt or cultured buttermilk. The key here is to use cream with at least 36% butterfat for the best results. Pour the cream into a mixing bowl and stir in the culture until it’s well combined. Cover the bowl with a cloth or plastic wrap, allowing it to sit at room temperature for 8 to 24 hours. This step is crucial, as it allows the bacteria to ferment the cream, creating that beloved tangy flavor.
After your cream has cultured, it’s time to whip it into butter. You can use a stand mixer, a hand mixer, or even a food processor for this step! Pour the cultured cream into the bowl of your mixer. Beat on medium speed until the cream thickens and eventually separates into butter and buttermilk. This should take about 8-12 minutes; keep an eye on it! Once you see clumps of butter forming, continue mixing until the butter has fully separated from the buttermilk. This buttermilk can be saved for baking or cooking, adding a delightful tang to your recipes.
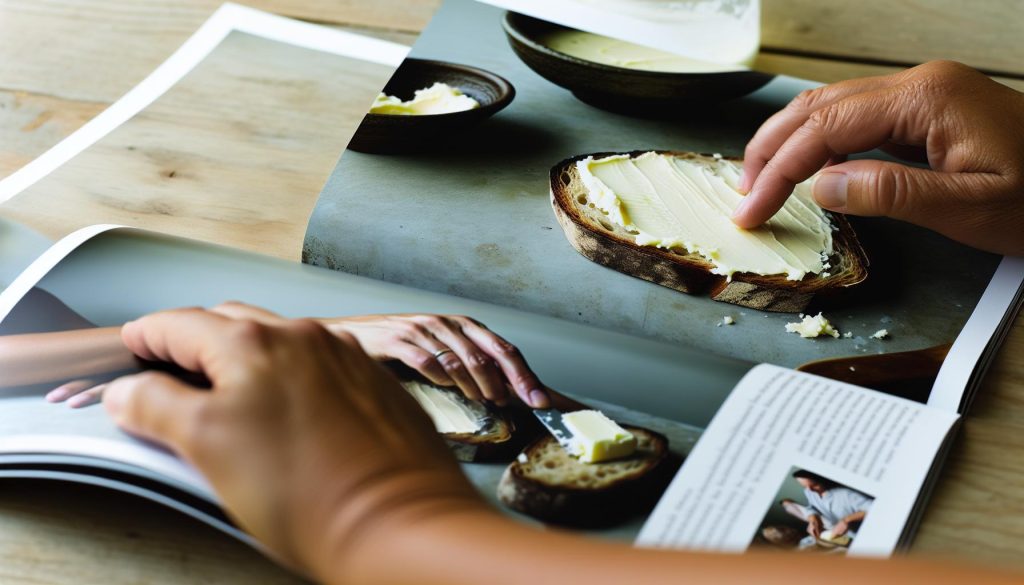
Now comes the fun part: rinsing the butter. Place the butter in a bowl and pour cold water over it. Knead the butter gently with your hands or a spatula to wash out any remaining buttermilk, which can spoil your butter faster. Repeat this rinsing process several times until the water runs clear. When you’re satisfied, pat the butter dry and transfer it to a storage container. If you’d like, now is the perfect time to add salt or herbs for extra flavor. Enjoy your homemade cultured butter on bread, vegetables, or anywhere else you want to add a touch of culinary magic!
Essential Equipment for Homemade Butter

To transform simple cream into luscious cultured butter, you don’t need a lot of fancy gadgets-just the right tools to guide you through this delightful culinary journey. Whether you’re a seasoned cook or a curious beginner, having the right equipment on hand can make the process straightforward and enjoyable.
First up, mixing equipment is vital. You can choose from a stand mixer, a handheld electric mixer, or even a food processor. Each option works wonders, but a stand mixer gives you the freedom to multitask while ensuring that the cream gets whipped thoroughly. If you’re using a food processor, just be mindful to monitor the consistency closely, as it can turn your cream to butter quite quickly.
Next, you’ll want a mixing bowl large enough to hold your cream and provide space for the whipping action. Stainless steel and glass bowls are both excellent choices, as they retain cold temperature, helping to keep the cream chilled while you work with it. Also, have a small bowl ready for separating the buttermilk from the butter towards the end of the process.
When it comes to rinsing your butter, a simple colander or fine mesh strainer will do the trick. This step is crucial to remove excess buttermilk, ensuring your cultured butter stays fresh longer. A spatula will help you gently press the butter against the sides to expel any remaining liquid. Finally, a set of airtight containers will be essential for storage, keeping your homemade butter deliciously rich and flavorful for weeks!
With just these basic tools, you’ll be well on your way to crafting your own creamy, tangy cultured butter. Embrace your inner kitchen artist and enjoy every step of the process-homemade butter is as much about the journey as the tasty end result!
How Long to Culture Butter for Maximum Flavor

To create truly mouthwatering cultured butter, the duration of the culturing process is key. The magic happens during fermentation, where the cream transforms into a deliciously tangy spread that bursts with flavor. Generally, you should allow your mixture to culture for at least 12 to 24 hours at room temperature, which will give the flavors time to develop beautifully.
While the minimum time is 12 hours, experimenting with longer culturing periods can yield even richer flavors. Some home cooks enjoy leaving their butter to culture for up to 48 hours. This extended time allows the friendly bacteria in your yogurt or starter culture to work their magic, producing a butter with a deeper tang and more complex flavor profile. Just be sure to taste your butter along the way; your palate will guide you to the perfect timing based on your personal preference.
After the culturing is complete, you can proceed with whipping the cream and separating the butter from the buttermilk. The yeasty notes and mild acidity from the longer culturing time can elevate your butter beyond the ordinary. To keep track, consider marking your jar or container with the time you start culturing, so you know exactly when to check for taste.
Keep in mind that environmental factors can play a role in the culturing process-warmer kitchen temperatures may speed up fermentation, while cooler environments may slow it down. It’s like having a conversation with your butter; you’ll get to know the perfect conditions for creating your ideal spread!
Variations of Cultured Butter to Try at Home
To elevate your homemade cultured butter beyond the ordinary, consider experimenting with delightful variations that infuse your favorite flavors. Customizing your butter not only showcases your creativity in the kitchen but also allows you to tailor it to complement diverse dishes. Here are some exciting ideas to inspire your culinary journey!
Herbed Cultured Butter
Fresh herbs can transform your cultured butter into a vibrant spread bursting with flavor. Start with 1 cup of cultured butter and mix in finely chopped herbs, such as:
- Chives for a mild onion flavor
- Parsley for a fresh, grassy note
- Thyme for a warm, earthy taste
- Rosemary for a robust and aromatic profile
Combine 1 tablespoon of herbs per cup of butter and adjust to taste. This herbed butter pairs beautifully with grilled meats, vegetables, or simply on a slice of rustic bread.
Citrus Zest Butter
A touch of citrus zest can invigorate your butter with refreshing brightness. Adding the zest of lemons, oranges, or limes creates a delightful balance to the rich creamy base. Use the zest of one fruit for every cup of cultured butter. This variation is fantastic for enhancing baked goods or melting over seafood for an extra zing.
Spicy Cultured Butter
If you enjoy a bit of heat, a spicy cultured butter is the perfect twist! Incorporate a pinch of cayenne pepper, a few dashes of hot sauce, or finely chopped jalapeños into your butter for a spicy kick. This butter is ideal for slathering on corn on the cob or topping grilled steaks.
Sweet Cultured Butter
Why not give sweet cultured butter a go? Blend in a teaspoon of vanilla extract or maple syrup to create a decadent spread perfect for toast, pancakes, or pastries. You can also experiment with adding cinnamon or nutmeg for a warm spice profile that complements breakfast treats.
By trying out these variations, you can make your cultured butter not just a condiment, but a gourmet addition to your meals. Each flavor profile is simple to create, encourages experimentation, and shows how accessible gourmet cooking can be. Enjoy the process of crafting your own unique spreads, and let your taste buds guide you!
Using Cultured Butter in Recipes: Tips and Ideas
Using cultured butter in your culinary creations can open up a world of flavor far beyond traditional spreads. Its rich and tangy profile not only enhances the taste of dishes but also adds a luxurious touch to everyday meals. Think of cultured butter as your secret ingredient for boosting everything from recipes to simple snacks. Here’s how to make the most of it in your kitchen!
One of the simplest yet most satisfying ways to use cultured butter is as a lavish base for sauces. Melt a few tablespoons in a pan and incorporate garlic, shallots, or fresh herbs for a delightful sauce to drizzle over vegetables, fish, or grilled meats. The distinct tang of cultured butter pairs beautifully with lemon juice, creating a bright and flavorful finishing touch to your dish.
Another fantastic application is in baking. Replace regular butter with cultured butter in recipes for cookies, scones, or muffins to achieve a richer taste and tender crumb. This swap can elevate classic recipes into gourmet delights. Consider using it in pastry dough for quiches or tarts, where the added flavor will shine through.
Don’t shy away from using cultured butter as a condiment. Spread it generously on warm, crusty bread or pancakes, letting it melt and blend into every bite. For an unforgettable breakfast, try slathering it on French toast, paired with a sprinkle of cinnamon or fresh berries. You can even create unique flavored butters by mixing herbs, spices, or sweet elements, making it the star of your charcuterie board or breakfast spread.
When it comes to storage, consider portioning your leftover cultured butter into smaller containers or freezing it in ice cube trays. This allows you to easily add a touch of indulgence to quick meals or when cooking for guests without the hassle of thawing an entire batch. The versatility of cultured butter is sure to inspire creative cooking and elevate your everyday meals to something truly special!
Storage Tips for Fresh Cultured Butter
To keep your homemade cultured butter fresh and flavorful, proper storage is key. After you’ve savored the satisfaction of making it from scratch, you want it to last as long as possible without compromising its rich, tangy taste. One of the best practices is to portion your butter into manageable sizes. This not only allows you to enjoy it fresh but also prevents the entire batch from being exposed to air and potential contaminants every time you open the container.
One effective method is to use ice cube trays. Simply spoon small amounts of your cultured butter into the compartments, freeze them until solid, and then transfer the cubes to a resealable freezer bag. This way, you can pull out just what you need for cooking or spreading without any waste. Just imagine adding a couple of butter cubes to a sauté pan for an instant flavor boost in your sauces or veggies!
If you prefer to keep some of your cultured butter at room temperature, consider using a butter bell or a crock. This delightful little gadget allows you to store your butter submerged in water, which creates a seal against air and keeps the butter soft and spreadable for weeks. Just make sure to change the water every few days to maintain freshness.
Lastly, remember that while cultured butter can safely sit out for shorter periods, it is best kept refrigerated for longer storage. Proper wrapping is essential – avoid aluminum foil and opt for parchment paper or reusable silicone wraps, which offer better protection against odors and moisture. By following these storage tips, you can continue to elevate your meals with your rich and tangy homemade cultured butter every time you reach for it!
Troubleshooting Common Cultured Butter Issues
Cultured butter can be a delightful yet sometimes tricky homemade project. Even the most seasoned home cooks can run into a few bumps along the way. By addressing common issues proactively, you can ensure that each batch comes out rich, tangy, and utterly delicious.
One of the most frequent issues is that the butter doesn’t separate properly after whipping. This can happen if your cream is too cold. A good tip is to let your cream warm up slightly before starting. Ideally, it should be around 60-65°F (15-18°C) when you begin whipping. If you’ve already started and find yourself in this situation, try placing the bowl in a warm spot in your kitchen for about 10 minutes, then give it another whirl. This gentle warming can help achieve that desired separation.
Another common challenge is ending up with a grainy texture in your finished product. Graininess often results from over-whipping, which causes the buttermilk and fat to separate too aggressively. If you notice this, don’t panic! You can save it by mixing in a bit of fresh cream to bring back some creaminess, then carefully re-whip to a softer consistency. Always keep your speed moderate when whipping, especially in the final stages, to prevent this from happening.
Lastly, if your cultured butter tastes too tangy, you might have let it culture too long or used a strong starter culture. To balance the flavor, consider blending in a small amount of unsalted butter or even a pinch of sugar, which can mellow the tanginess. Additionally, experimenting with different starter cultures can help you find the right flavor profile suited to your taste.
By staying attuned to these pointers and gently troubleshooting as needed, you can enhance your homemade butter-making experience. Remember, each batch is an opportunity to learn and experiment, bringing a touch of gourmet delight to your kitchen!
Health Benefits of Cultured Butter: Why It’s Worth It
Cultured butter is not just a delightful ingredient to spread on your morning toast; it also boasts a myriad of health benefits that can make it a valuable addition to your kitchen. Unlike regular butter, cultured butter is made by fermenting cream, which enriches its flavor and enhances its nutritional profile. One of the standout benefits of cultured butter is its rich content of vitamins A, D, E, and K2-essential nutrients that support everything from immune function to bone health. This fortified butter can even help improve nutrient absorption in your body, allowing you to make the most of the foods you eat.
Another remarkable aspect of cultured butter is its potential to aid digestive health. The fermentation process introduces probiotics, which are beneficial bacteria that promote gut health. This may be particularly appealing if you’re sensitive to lactose, as cultured butter typically contains lower levels due to the fermentation breaking down lactose into simpler compounds that are often easier to digest [1][3].
Incorporating cultured butter into your recipes not only adds a creamy, tangy twist but also allows you to enjoy these enhanced health benefits. So why not embrace this versatile ingredient in your cooking? It’s an easy way to elevate the nutrition of your meals while enjoying the satisfaction of homemade creation.
Exploring Gourmet Flavors for Homemade Spreads
Crafting gourmet spreads from cultured butter opens up a world of flavor possibilities that can elevate any meal. From sweet to savory, the options are abundant, allowing you to get creative and experiment right in your kitchen. One of the simplest ways to introduce gourmet flair is by stirring in ingredients that complement the rich, tangy notes of cultured butter. Imagine your morning toast topped with a luscious spread infused with fresh herbs, a hint of citrus zest, or even sweet honey. Each addition transforms the butter into something truly special, making even the simplest dish feel gourmet.
Start with the classics: fresh herbs such as chives, basil, or thyme can add brightness and complexity. Simply mince your chosen herbs and fold them into your softened cultured butter, adjusting to taste. For a more robust flavor profile, consider adding smoked paprika or garlic powder, which brings a wonderful depth that pairs perfectly with roasted vegetables or grilled meats. If you’re in the mood for something sweeter, a touch of honey, maple syrup, or vanilla extract can create a heavenly spread that complements pancakes or scones beautifully.
To take things up a notch, don’t shy away from bold ingredients. Consider incorporating cheese-like crumbled feta or grated Parmesan-for a savory twist. You could also add spices such as cumin or coriander, which can turn your butter into a delightful dip for fresh bread or vegetables. The goal is to play with contrasting flavors: combine sweet with salty, or spicy with creamy, to find what delights your palate.
Here’s a quick idea to get you started: mix ½ cup of cultured butter with 1 tablespoon of finely chopped rosemary, 1 teaspoon of lemon zest, and a pinch of sea salt. Spread it on warm bread or use it to finish a steak. This versatility makes cultured butter not just an ingredient but a canvas for your culinary creativity-encouraging experimentation and allowing rich, gourmet flavors to shine through in every bite.
The history and Art of Cultured Butter-making
Cultured butter has captivated Taste buds for centuries, tracing its origins back to ancient civilizations where the art of fermentation was mastered. From the lush pastures of Europe to the sun-kissed fields of India, cultures around the world have developed unique techniques to produce this rich, tangy delight. The process of cultured butter-making combines the preservation methods of yesteryears with the culinary creativity of today, allowing home cooks to embrace a historical tradition in their own kitchens.
The key to this creamy masterpiece lies in the fermentation. By introducing live cultures-often sourced from yogurt or buttermilk-into heavy cream, the mixture sours and develops complex flavors. This transformation not only enhances the butter’s taste but also contributes to its health benefits, as the probiotics improve digestion and add depth to its creamy richness. Many cultures have crafted their variations, with styles ranging from the sweet, milky flavored French beurre to the more prominently tangy Northern European butters.
Making cultured butter is less about complex kitchen gadgets and more about patience and quality ingredients. The process invites experimentation, where cooks can adjust fermentation times to suit personal preferences, crafting flavors unique to their own tastes. This art is not confined to the kitchen alone; sharing homemade cultured butter with friends and family can bring a sense of joy and accomplishment, transforming a simple spread into a centerpiece of culinary creativity.
As you delve into making your own cultured butter, remember that this age-old practice is an opportunity to connect with the past while creating flavors for the future. Whether you’re spreading it on warm bread or using it as a base for gourmet creations, each batch carries the essence of tradition. So gather your ingredients, embrace the fermentation process, and enjoy crafting your slice of history at home-one tangy spread at a time.
Faq
Q: What is the best cream to use for making cultured butter?
A: The best cream for making cultured butter is high-fat heavy cream. Look for cream that is at least 36% fat content for a rich texture and flavor. Using organic cream can enhance the overall taste due to the quality of the milk.
Q: How long does it take to culture butter?
A: Culturing butter typically takes 24 to 48 hours. The exact time depends on the temperature of your kitchen and the specific cultures used. For a more robust flavor, consider letting it culture for the full 48 hours.
Q: Can I use milk instead of cream for cultured butter?
A: While you can use milk, it is not ideal for cultured butter as it has a much lower fat content. Heavy cream is recommended for achieving the desirable richness and tanginess in your butter.
Q: How do I know when my butter is properly cultured?
A: Your butter is properly cultured when it has developed a pleasant tangy aroma and flavor. It should also appear thicker and slightly more yellow than un-cultured butter. Tasting a small amount can also help assess its readiness.
Q: What equipment do I need to make cultured butter at home?
A: To make cultured butter, you need a mixing bowl, whisk or electric mixer, and a fine mesh strainer or cheesecloth for draining. You may also want a food thermometer to monitor the cream’s temperature during culturing.
Q: Can I add flavors to my cultured butter?
A: Yes, you can add flavors to your cultured butter! Consider mixing in herbs, spices, or even citrus zest after churning for a unique twist. However, ensure the flavors complement the tangy profile of the cultured butter.
Q: What is the difference between cultured butter and regular butter?
A: The primary difference is that cultured butter is made from fermented cream, giving it a tangy flavor and creamier texture. Regular butter is made from just sweet cream without fermentation, leading to a milder taste.
Q: How can I troubleshoot issues with my cultured butter?
A: Common issues include separation or insufficient culturing. If separation occurs, ensure your cream is at the right temperature (around 70°F). If it’s not tangy enough, try extending the culturing time or adjusting the buttermilk proportion. For more tips, check the troubleshooting section in your recipe guide.
The Conclusion
Making your own cultured butter is not just simple; it’s a rewarding way to elevate your meals with a rich, tangy flavor that’s hard to find in store-bought options. Don’t wait to savor the taste of homemade butter-dive in today and experience the satisfaction of crafting your own spread in just a few easy steps! For tips on perfecting your technique, check out our guides on choosing the best cream and flavoring your butter with herbs or spices for an exciting twist.
If you’re inspired by this recipe, why not explore our other homemade delights? Discover the art of making cheese or check out our collection of no-bake desserts for easy treats. Join our community of passionate home cooks and share your creations with us-we love hearing your stories! Sign up for our newsletter to stay updated and unlock exclusive recipes that will transform your kitchen adventures. Your culinary journey is just beginning-let’s explore together!


