Imagine sipping a homemade glass of fortified wine, rich in flavor and uniquely crafted by your own hands. Fortified wine, typically stronger and sweeter than regular wines, is made by adding spirits, creating a delightful complexity that can elevate any occasion. It’s not just about enjoying a nice drink; it’s about the creativity and satisfaction of crafting something special right in your kitchen.
Whether you’re looking to impress guests or simply indulge in a fun DIY project, making fortified wine is an accessible way to dive into winemaking without needing expert skills or fancy equipment. This guide will walk you through the simple steps to create your own artisanal fortified wine, making use of easily sourced ingredients. You’ll soon discover that with a little patience and experimentation, you can master a process that has been cherished for centuries. So, let’s get started on this flavorful journey of homemade goodness!
Selecting Quality Ingredients for Fortified Wine
Selecting the right ingredients is crucial for crafting a rich and flavorful fortified wine that you’ll be proud to share. Whether you’re a seasoned winemaker or just starting out, the quality of your base ingredients will significantly impact the final product. You’ll be surprised how simple yet powerful choices can elevate your homemade wine into something spectacular.
To begin, choose a high-quality base wine. Look for a wine that you already enjoy drinking, as its flavor profile will be enhanced by the fortification process. Consider varieties such as Sherry, Port, or even a full-bodied red. The natural sweetness and complexity of the wine will lend itself beautifully to the rich, concentrated flavors you aim for in fortified styles.
Next, the fortifying spirit is equally important. Opt for a neutral grape brandy or a spirit that complements the flavors of your base wine. For example, a rich, aged brandy adds depth, while a neutral spirit keeps the focus on the wine’s inherent characteristics. It’s essential to use a spirit with a higher alcohol content (around 40-60%) to effectively halt fermentation and preserve the desired sweetness in your wine.
Additionally, consider enhancing the flavor by using quality adjuncts. Herbs, spices, and even dried fruits can add unique notes to your fortified wine. Don’t shy away from experimenting; a cinnamon stick or some dried cherries can introduce a delightful twist. Just ensure that whatever you add is fresh and of good quality, as this will contribute to the overall taste and aroma of your final product.
Finally, remember to source ingredients that reflect your personal tastes and creativity. You want your fortified wine to be a true expression of your culinary journey. Embrace the exploration of flavors and enjoy the process of creating something uniquely yours!
Essential Equipment for Home Winemaking
Creating your own fortified wine at home can be a rewarding and enjoyable process, and you don’t need to invest in fancy equipment to get started. With a few essential tools, you’ll be on your way to crafting a rich and flavorful beverage that impresses friends and elevates your culinary creations.
First, you’ll need a good-quality fermentation vessel. A clean, food-grade glass carboy or a sanitizable plastic fermenter with a sealed lid is ideal. This allows for a controlled fermentation process and protects your wine from exposure to air. Make sure your container is large enough to hold the volume of wine you’re making, plus a little extra to account for foaming during fermentation.
Next, a hydrometer is a handy tool that you won’t want to skip. It measures the specific gravity of your must (the mixture of juice and solids), helping you monitor fermentation progress and determine the potential alcohol content. A simple winemaking kit often includes this tool, along with other useful items.
Essential Equipment List:
- Fermentation Vessel: Glass carboy or sanitized plastic fermenter
- Hydrometer: For measuring sugar levels and potential alcohol
- Airlock: To allow gases to escape while keeping out contaminants
- Siphoning Equipment: A racking cane or siphon helps transfer wine between containers
- Bottles: Clean wine bottles or jars for storage
- Corker: A simple corking device if using corked bottles
- pH Meter (optional): For checking the acidity of your wine
Don’t forget sanitization! Keeping everything clean and sterilized is crucial in winemaking. Use a reputable sanitizing solution to wash all your equipment before use, ensuring that no unwanted bacteria spoil your creation.
Finally, consider adding a few creative touches to your setup. A simple label for your finished wine can make it feel even more special. Plus, tracking and noting your process can help refine your technique for future batches. Embrace your inner winemaker and enjoy the process-each step brings you closer to a delicious result!
Understanding the Fortification Process
The fortification process is the magic that transforms regular wine into a delightful, richer beverage. By adding distilled spirits-typically neutral grape brandy-at a certain stage of fermentation, you can amplify the wine’s flavor and increase its alcohol content. This technique not only enhances the complexity of the wine but also provides a unique sweetness and body that sets fortified wines apart from their traditional counterparts.
Timing is crucial in the fortification process. As fermentation begins and yeasts consume sugars, you want to monitor the sugar levels carefully. When the specific gravity reaches your desired level of sweetness-and before the yeast has consumed all the sugars-you’ll add the distilled spirit. This process effectively halts fermentation, preserving the natural sweetness of the wine while boosting its alcohol content. Aim for a final alcohol content between 16% and 20%, depending on your recipe and preference.
Here’s a practical example to guide you: suppose you’re making a homemade port-style wine. Begin by placing your grape must in your fermentation vessel and let it ferment until it reaches a specific gravity of around 1.020 to 1.030. At this point, gently add your distilled spirit at a ratio of approximately one part spirit to four parts wine. Stir thoroughly and seal your fermenter to encourage a brief, secondary fermentation, which will infuse the spirit’s character into the wine.
Understanding this process opens up a world of creativity. Feel free to experiment with different types of spirits or even infusions, like brandy aged in oak or flavored liqueurs, to develop unique tastes in your fortified wines. As you perfect your technique, you’ll discover the richness of flavors that homemade fortified wines can bring to your palate and share at gatherings. Enjoy the journey of crafting your perfect blend!
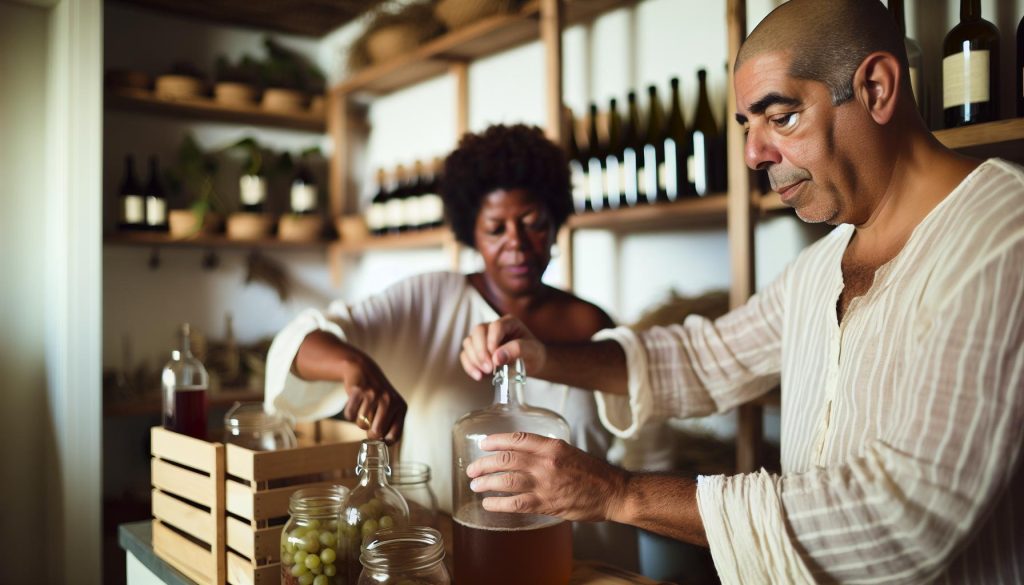
Step-by-Step Guide to Making Fortified Wine
Making fortified wine at home is an exciting adventure that blends science and artistry. The process allows you to craft rich, flavorful beverages tailored to your taste, and it’s easier than you might think! With just a few key ingredients and straightforward steps, you can produce a delicious fortified wine that rivals those found in specialty stores.
Start with your ingredients, which typically include high-quality grapes or grape juice, a neutral distilled spirit like grape brandy, and optionally, sugar or additional flavorings. You’ll also need some essential equipment, like a fermentation vessel, an airlock, a hydrometer for measuring specific gravity, and bottles for storing your finished product.
Step-by-Step Process
- Prepare the Must
– Crush your grapes or pour your juice into the fermentation vessel. If using grapes, remember to remove any stems or leaves. Aim for about 5 to 10 pounds of grapes per gallon of wine.
- Start Fermentation
– Add yeast to kick off fermentation. Make sure to choose a wine yeast suited for the style you’re making (e.g., port yeast for a sweet port-style wine). Seal the vessel with an airlock and let it ferment for about a week, monitoring the specific gravity.
- Monitor Sugar Levels
– As fermentation progresses, keep an eye on the specific gravity using your hydrometer. When it drops to around 1.020 to 1.030, it’s the perfect time to add your distilled spirit.
- Fortify the Wine
– Carefully measure out your spirit at a ratio of about one part spirit to four parts fermented grape must. Pour the spirit into the fermenter gently to avoid excessive foaming. Stir well to ensure it’s evenly mixed and then seal it again to allow a brief secondary fermentation.
- Aging
– Once fortified, transfer your wine to a clean, sanitized vessel for aging. This stage can last from a few months to several years, depending on the flavor profile you’re aiming for. Store the wine in a dark, cool place and consider periodically tasting it to check on its development.
- Bottling
– After aging, when you’re satisfied with the flavor, it’s time to bottle your fortified wine. Ensure your bottles are sanitized beforehand. Using a funnel, pour the wine into bottles, leaving a little space at the top before sealing them.
- Enjoying Your Creation
– Once bottled, you can let your creation rest further or enjoy it right away! Remember that fortified wines often taste even better after some time, as flavors continue to develop and mellow.
By taking these steps, you’ll not only end up with a lovely fortified wine but also gain a deeper appreciation for the process. Don’t hesitate to experiment with different types of fruit, spirits, or even oak aging, as this is your chance to showcase your creativity in the kitchen. Happy winemaking!
Creative Flavor Additions for Homemade Variations
Let your creativity shine when crafting your fortified wine! Flavors are what truly set homemade varieties apart from commercial options, and the possibilities are nearly endless. Whether you’re infusing it with spices, fruits, or herbs, these creative additions can elevate your wine experience and cater to your unique palate.
Fruits and Juices
Adding fruits can lend a delightful twist to your fortified wine. Common choices include dried fruits like figs, raisins, or apricots, which can be steeped in the wine during fermentation. Fresh fruits, like berries or citrus peels, can also infuse vibrant flavors. Consider making a berry-infused port by adding mixed berries during the fermentation process, allowing their natural sweetness to meld seamlessly with the wine. Aim for about a cup of dried fruit or a handful of fresh fruit per gallon of must to start.
Spices and Herbs
Spices and herbs can bring warmth and depth to fortified wines. Cinnamon sticks, star anise, cloves, or even a dash of vanilla extract can create a cozy profile. If you’re feeling adventurous, try adding a few sprigs of fresh rosemary or thyme during the aging phase for an herbal twist. Typically, one to two sticks of spice or a handful of herbs can infuse the flavor without overwhelming it.
Sweeteners and Flavorings
If you prefer a sweeter wine, consider adding sugar, honey, or maple syrup. These can be dissolved in the must at the beginning; about half a cup of sugar per gallon is a good place to start, adjusting to your sweetness preference. For an extra layer, think about adding liqueurs like orange liqueur or coffee liqueur during the fortification stage-just a shot or two can transform your wine into a richer experience.
Aging Techniques
Aging in different types of barrels (or even in contact with oak chips) can infuse your wine with complex flavors. This method is especially effective if you’re going for a more traditional fortified wine profile like sherry or port. Experiment with toasting the oak lightly before adding it into your aging vessel-this can introduce hints of caramel and vanilla that beautifully complement the wine’s original flavors.
Feel free to mix and match these flavor additions to find your perfect blend. Remember that winemaking is a personal journey, so don’t hesitate to adjust these suggestions to suit your taste. Have fun, trust your instincts, and enjoy the process of flavor experimentation!
Fermentation Techniques: Tips and Tricks
When diving into homemade fortified wine, mastering fermentation techniques can transform a good batch into a great one. The fermentation process is where the magic happens, turning your simple grape juice into an aromatic and complex libation. Here are some tips and tricks to help you navigate this essential stage of winemaking effectively.
Temperature Control
Humidity and temperature play crucial roles in fermentation. Ideally, maintain a temperature between 65°F to 75°F (18°C to 24°C). Too hot, and you could kill the yeast; too cold, and fermentation may stall. Using a simple thermometer can ensure you’re in the right range, making it easier for the yeast to thrive. If your environment is too warm, consider placing your fermenter in a cooler spot or using a fermentation wrap to regulate temperatures.
Choosing the Right Yeast
Different yeast strains impart unique flavors and characteristics to your wine. For fortified wines, a robust strain like Lalvin EC-1118 or Red Star Premier Classique is recommended due to their high alcohol tolerance and ability to ferment under varying conditions. Don’t forget to hydrate your yeast before pitching it into the must, which can improve fermentation efficiency. Simply mix it with warm water for about 15 minutes before adding.
Monitoring Fermentation
Keep a close eye on your fermentation activity. Look for bubbles forming in the airlock or a frothy cap on the surface of the must. This indicates that fermentation is underway. Use a hydrometer to measure specific gravity. This gives you insight into sugar levels and helps track the fermentation progress. Take initial and periodic readings to gauge when fermentation is complete-usually indicated by stable readings over several days.
Nutrient Additions
Consider adding yeast nutrients, particularly if you’re using a high-sugar must. Nutrients provide enzymes that help yeast thrive, leading to a healthier fermentation. A general guideline is to add 1 teaspoon per gallon of must at the start. This can help prevent your yeast from becoming sluggish, ensuring robust fermentation and a well-rounded final product.
With these techniques, you’ll be well-equipped to tackle the fermentation phase of fortified wine production. Remember that patience is key; fermentation times can vary, and monitoring your wine closely will allow you to enjoy the rich results of your efforts. Embrace the process, and you’ll find yourself creating a fortified wine that’s uniquely yours!
Troubleshooting Common Fortified Wine Problems
Crafting homemade fortified wine is an exciting adventure, but like any kitchen project, it can come with its fair share of hiccups. Whether you’re facing issues during fermentation or problems with flavor clarity, knowing how to troubleshoot common concerns can save your batch and refine your winemaking skills.
Fermentation Stalling
One of the most common issues is fermentation suddenly stopping. This can happen for several reasons, such as low temperatures or insufficient yeast nutrients. If you notice that bubbling has stopped and your specific gravity readings haven’t changed for a few days, it’s time to take action. First, gently warm your fermenter by moving it to a slightly warmer area or using a fermentation wrap to increase temperature gradually. If this doesn’t work, consider adding some hydrated yeast or yeast nutrients to give your yeast a little boost.
Off Flavors
If your fortified wine develops unpleasant off-flavors, it can be disheartening. Common culprits include using grapes that are overripe or under-ripe, or introducing wild yeast or bacteria during the process. To address this, ensure you are starting with quality ingredients and practicing good sanitation. If off-flavors occur, you might mask them by blending your wine with another batch or adding spices like cinnamon or vanilla to complement the flavors, creating a more balanced profile.
Cloudiness
Cloudy wine is often the result of suspended particles or proteins that did not settle during fermentation. To clarify your wine, consider using fining agents like bentonite or egg whites, which help to attract and bind these particles, making it easier for them to settle to the bottom. A gentle racking after this process can help transfer clear wine into a new vessel.
Too Sweet or Dry
Determining the right sweetness level is crucial to your fortified wine. If it’s too sweet, it may be a sign that fermentation has halted too early. One way to adjust sweetness is by back-sweetening with concentrated grape juice or sugar syrup after fermentation is complete, but be sure to stabilize your wine first to prevent further fermentation. If it’s too dry, you can evaluate the residual sugar levels and decide to add a bit more when bottling. Stepping carefully through these tweaks not only salvages your wine but enhances your understanding of the winemaking process.
With these troubleshooting tips, you’ll feel empowered to handle the common challenges that come with making fortified wine at home. Remember, every mistake is a learning opportunity, and each batch brings you closer to your perfect creation!
Aging Your Fortified Wine: Best Practices
Aging your fortified wine can transform its character and enhance its complexity, turning a good batch into a great one. This process, often overlooked by beginner winemakers, is where the magic truly happens. With patience and care, aging allows your wine to develop deeper flavors, integrating the spirits and the base wine into a harmonious blend that delights the palate.
To start, it’s important to choose the right containers. Oak barrels are traditional for aging fortified wines like Port or Sherry, imparting subtle tannins and flavors of vanilla and spice. However, if a barrel isn’t accessible, glass carboys or even food-safe plastic containers can work well. It’s crucial to keep your chosen vessel in a cool, dark place to avoid overheating or light exposure, both of which can spoil your wine.
Timing is Everything
Understanding the aging timeline is key to producing a well-rounded fortified wine. Most fortified wines benefit from aging for at least six months to a year, but some varieties can age for many years. For example, vintage Port is often left to mature for a decade or more to develop its full potential. Here’s a quick guide to aging timelines for common styles of fortified wine:
| Type of Fortified Wine | Recommended Aging Time |
|---|---|
| Port | 3-20 years |
| Sherry | 6 months to several years |
| Madeira | 3-10 years |
| Vermouth | 1-2 years |
Monitoring and Tasting
During the aging process, periodically tasting your wine is essential. This practice not only helps you track its development but also allows you to can adjust your method as needed. If you find the taste becoming too strong or complex, you may decide to stop the aging process early. Also, be sure to keep records of your tastings, noting changes and preferences-which will be invaluable for future batches.
Patience is a winemaker’s best friend. Don’t rush the process; the best flavors unfold naturally over time. With a little practice and curiosity, you’ll discover the nuances of aging your homemade fortified wine, creating a unique expression tailored to your tastes. This journey will not only enhance your wine but also deepen your appreciation for the art of winemaking. Happy aging!
Serving and Pairing your Fortified Wine
Serving fortified wine can be as delightful as making it, offering a chance to showcase your creation in delicious and creative ways. Whether you’ve crafted a rich Port or a velvety Sherry, understanding how to serve and pair these wines can elevate your dining experience to new heights. One fascinating aspect of fortified wine is its versatility; it can be enjoyed on its own or paired with a variety of foods, enhancing flavors and creating memorable moments.
When it comes to serving, the temperature is crucial. Most fortified wines are best enjoyed slightly chilled, especially lighter styles like dry Sherries and some Vermouths, which can be served at around 50-55°F (10-13°C). Richer wines like Port or Madeira, on the other hand, are delicious at cellar temperature or around 60-65°F (15-18°C). Pour your homemade fortified wine into appropriate glasses; a smaller port glass is perfect for Ports, allowing you to appreciate the aromas, while Sherries suit a white wine glass well.
Pairing with Food
Fortified wines shine when paired with food, creating delightful combinations that highlight both the dish and the wine. Here are some suggestions for pairing your homemade creations:
- Port: Enjoy sweet and rich Ports with strong cheeses like blue cheese or aged cheddar. Alternatively, they pair beautifully with desserts, especially chocolate and berry-based treats.
- Sherry: Dry Sherry can be a fantastic match with tapas, particularly olives, nuts, and Iberian ham. Sweet Sherries complement desserts like flan, fruit tarts, or even dark chocolate.
- Madeira: The nuttiness of Madeira works well with savory dishes like roasted meats and game. For a sweet touch, it pairs harmoniously with dried fruits, nuts, and rich desserts like bread pudding.
- Vermouth: As an aperitif, serve Vermouth with light snacks like bruschetta or seafood to awaken the palate before a meal.
Creative Serving Ideas
Serving your fortified wine can be an art in itself. Think about creating a tasting flight featuring different styles of fortified wine, allowing guests to explore the variety. You can also concoct unique cocktails using your homemade Vermouth or Sherry, mixing them with fresh herbs, citrus, or soda for invigorating beverages. Just remember that wine is meant to be enjoyed, so set a relaxed atmosphere, perhaps with soft music, to make the experience even more special.
With a little creativity and some thoughtful pairing, your homemade fortified wine can take center stage at any gathering or quiet evening at home. Enjoy every sip, and don’t hesitate to experiment with new combinations to discover delightful surprises!
Storing Your Homemade Fortified Wine
is a crucial step that can greatly influence its flavor and longevity. Unlike regular wine, fortified wines boast higher alcohol content, which helps preserve them, but they still benefit from proper storage practices to maintain their quality. A well-stored bottle can age gracefully, enhancing its character over time, while improper storage may lead to a decline in taste and aroma.
Keep your bottles upright to prevent any sediment that may have settled from contacting the cork; this can lead to spoilage. A consistent environment is key. Aim for a cool, dark location with a stable temperature, ideally between 55-65°F (13-18°C). Fluctuations can cause the wine to expand and contract, potentially disrupting the seal and allowing unwanted air inside the bottle. A temperature-controlled wine fridge can be an excellent investment if you plan to store wine long-term.
Light and Humidity
Exposure to light can degrade your wine’s flavors and aromas. Store your bottles in a dark place, away from direct sunlight and fluorescent lighting. If you’re using clear bottles for your creations, consider wrapping them in a cloth or placing them in a box that blocks out light.
Humidity is another important factor; aim for a relative humidity level between 50-70%. Too little humidity may dry out the corks, letting air seep in, while too much can promote mold growth. If your storage area is generally dry, consider placing a small humidifier or a dish of water nearby to maintain that essential moisture level.
Labeling and Inventory
Don’t forget the importance of labeling! Create a simple system to note the type of wine, the date it was made, and any special notes about flavor profiles or serving suggestions. This will help you keep track of your wines and remember which ones to enjoy first based on their optimal drinking window.
By ensuring the right conditions for your homemade fortified wines, you’re setting up a delightful aging journey that can lead to wonderful discoveries with each bottle. So take the time to create a proper storage environment, and your efforts will pay off with exceptional sips in the future!
Exploring Fortified Wine Styles Around the World
Exploring the rich tapestry of fortified wine styles worldwide can inspire your own homemade creations and deepen your appreciation of this unique category. Did you know that fortified wines trace their origins back to ancient times, where they were first developed as a way to preserve wine for long journeys? Today, these wines boast distinct characteristics based on their origins, production methods, and the grapes used, making them a truly global delight.
In Portugal, you’ll find the renowned Port wine, typically from the Douro Valley. This wine is well-loved for its rich flavors that range from sweet to robust, with popular varieties like Ruby, Tawny, and Vintage, each offering a different taste experience. The fortification process here usually involves adding aguardente (a grape brandy), which halts fermentation and retains the natural grape sugars, resulting in a deliciously sweet wine. For a fun twist, consider creating your own version of Port by experimenting with varieties of fruits, spices, or even chocolate during the fermentation.
Then there’s Sherry from Spain, particularly from the Jerez region. Sherry is fascinating because it covers a wide spectrum of styles-from the dry Fino to the sweeter Pedro Ximénez. The unique aging process called solera system can be mimicked at home by blending your wines over time, aiming for depth and complexity. You can experiment with local white grapes to achieve a similar profile, allowing your fortified creations to reflect your personal touch and local terroir.
In Italy, you can’t miss Marsala, a fortified wine that is often used in cooking and has a distinctive flavor borne from aging in wooden casks. It’s crafted from Sicilian grapes, and just like Sherry, it can range from dry to sweet. When making your version, consider incorporating some aromatic herbs or nuts to complement the deep, rich flavors of the wine.
Lastly, let’s take a brief peek into some lesser-known styles, like Vin Doux Naturel from France, which captures the beauty of sweet, fortified wines made from Muscat grapes. The versatility of these styles highlights how local ingredients and climate influence the final product.
Whether you’re inspired by a classic or keen to create your own signature style, the world of fortified wines is full of opportunities for creativity and experimentation in your kitchen. So gather your ingredients and get ready to embark on an exciting winemaking journey that honors these cherished traditions while adding your unique flair!
Safety Tips for Homemade Winemaking
When you’re venturing into the exciting world of homemade winemaking, safety should be at the top of your mind. Understanding the risks and taking simple precautions can make your winemaking experience enjoyable and successful, without any unexpected surprises. After all, the goal is not just to create a delicious fortified wine but to do so in a way that keeps your kitchen safe and your health intact.
First and foremost, ensure you’re working in a clean and sanitized space. Bacteria and wild yeast can spoil your wine, leading to off-flavors or unsafe results. Clean all your equipment-like fermentation vessels, bottles, and tools-with a solution specifically designed for sanitizing. A simple rinse with hot water isn’t enough; you need to eliminate all potential contaminants. Think of it as a vital step, much like preheating your oven before baking-without it, your efforts could go awry.
Another crucial safety tip revolves around alcohol content. When fortifying wine with spirits, you’re increasing the alcohol level significantly. Always measure accurately to avoid creating a mixture that’s dangerously potent. Use a hydrometer to keep track of your alcohol by volume (ABV). It’s a great way to ensure that you stay within safe drinking limits. For reference, an ABV of over 20% can make your wine more susceptible to spoilage, and higher alcohol concentrations can also mask the wine’s flavors, detracting from your well-deserved creation.
Mind Your Ingredients
Pay close attention to the ingredients you use. Opt for high-quality grapes and spirits, as impurities can lead to undesirable results. For instance, if you’re using dried fruits or spices for flavoring, make sure they are fresh and free from molds or contaminants. It’s these details that can elevate your fortified wine, but they also require diligence to ensure you’re not introducing anything harmful.
Finally, always label your bottles with important information like the date of bottling and the ingredients used. This not only helps you monitor your wine’s progress but also allows you to track any effects if something goes awry. If you ever notice unusual smells, colors, or textures in your homemade wine, trust your instincts-it’s better to be safe and discard any questionable batches than to risk your health.
By following these simple yet effective safety tips, you’ll set a solid foundation for your winemaking journey. Enjoy the process, embrace your creativity, and remember that safety is essential to crafting your delicious fortified wine. So gather your ingredients, roll up your sleeves, and enjoy the fulfilling adventure of creating something uniquely yours!
Frequently asked questions
Q: What are the best wines for fortification?
A: The best wines for fortification are typically dry and fruity varieties, such as white wines made from Muscat or red wines like Port or Sherry. These wines have a balanced acidity that complements the sweetness of the added spirits. Experimenting with different base wines can yield unique flavors in your homemade fortified wine!
Q: How much brandy should I add to fortify wine?
A: A common guideline is to add about 1 part brandy to 4 parts wine for a balanced fortification. This can vary based on your preference for strength and sweetness. Gradually add brandy, tasting as you go to achieve your desired flavor profile!
Q: Why is it important to use neutral grape brandy for fortification?
A: Using neutral grape brandy is important because it enhances the wine without altering its flavor too much. This ensures that the original wine’s characteristics remain intact, resulting in a well-balanced fortified wine. Aim for a brandy with around 80-100 proof for optimal results.
Q: How long should I age my homemade fortified wine?
A: Ageing homemade fortified wine typically takes between 6 months to a year, depending on the type of wine and your flavor preferences. Store it in a cool, dark place to allow the flavors to mature and meld. Consider tasting it periodically to find the perfect aging point for your palate.
Q: Can I use spices or herbs to flavor my fortified wine?
A: Absolutely! Infusing spices and herbs like cinnamon, vanilla, or even citrus peels can add complexity to your fortified wine. Start with small amounts and let it steep for a few days, tasting regularly to achieve your preferred flavor intensity.
Q: What common mistakes should I avoid when making fortified wine?
A: Avoid over-fermenting your base wine, as this can lead to excessive acidity. Another mistake is using overly sweet base wines, which can throw off the balance. Follow the fermentation techniques outlined in your guide carefully for the best results!
Q: How should I serve my homemade fortified wine?
A: Serve your homemade fortified wine at a slightly chilled temperature, typically between 50°F and 60°F. Pair it with cheeses, desserts, or even enjoyed straight. Glassware choice can enhance the experience; consider using smaller glasses to concentrate the aromas.
Q: How do I store my fortified wine long-term?
A: Store your fortified wine in a sealed bottle in a cool, dark place. Aim for a temperature between 55°F and 65°F. This will help preserve its flavors and aromas for an extended period. Remember to keep bottles upright to prevent cork degradation.
In Conclusion
Congratulations on embarking on your journey to create your very own fortified wine! Remember, the key takeaway is that it’s all about balancing flavors and finding the right blend that suits your palate. As you experiment with different varieties and sweetness levels, don’t forget to share your experiences with us-your successes and even your learning moments!
If you enjoyed this rich and strong homemade recipe, check out our guides on wine aging techniques and crafting homemade liqueurs. These topics will enhance your winemaking skills and inspire you to explore even more delicious creations.
Ready to dive deeper into the world of winemaking? Sign up for our newsletter for exclusive recipes and expert tips that will help you refine your craft. Don’t hesitate-start your unique fortified wine adventure today, and let your creativity flow!


