
✨ This article was AI edited. Editorial responsibility: RecipesFromTheHomestead.com.
Produced with AI. This article was artificially generated. Editorial responsibility: RecipesFromTheHomestead.com.
Winemaking at home is the controlled biochemical transformation of fruit sugars into ethyl alcohol and carbon dioxide through Saccharomyces cerevisiae yeast fermentation, practiced in sanitary food-grade carboys with strict temperature regulation, hydrometer monitoring, and anaerobic racking protocols.
Crafting wine at home is one of the most rewarding traditions of the modern homestead. Whether you are pressing hand-harvested wild blackberries, estate concord grapes, or pure varietal grape must concentrates, the biological fundamentals remain timeless. By mastering sanitization, must preparation, yeast inoculation, and racking schedules, any dedicated home vintner can consistently produce elegant, clear, and age-worthy vintages that rival commercial cellar offerings.
The Essential Equipment Suite for Home Cellaring
Before crushing your first cluster of fruit, assembling the proper food-grade equipment ensures your batches remain free of bacterial spoilage and oxidation:
- Primary Fermentation Vessel: A 6.5-gallon food-grade plastic fermentation bucket with an airtight lid and drilled grommet for an airlock. Primary fermentation requires extra headspace (20–30%) to accommodate vigorous carbon dioxide foam and rising fruit caps.
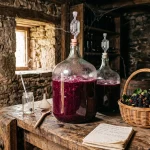
- Secondary Fermentation Carboy: A 5-gallon or 6-gallon thick glass demijohn carboy. Glass is completely impermeable to oxygen and allows clear visual inspection of clarifying sediment and lees settling.
- Three-Piece Airlock & Rubber Bung: Filled with sanitizer solution or cheap vodka, the airlock allows carbon dioxide gas to escape while maintaining a positive-pressure barrier against oxygen, fruit flies, and wild acetobacter bacteria.
- Triple-Scale Specific Gravity Hydrometer: The essential instrument for measuring dissolved sugar density, calculating potential alcohol by volume (ABV), and verifying terminal dry fermentation.
- Auto-Siphon & Food-Grade Vinyl Tubing: Allows sediment-free liquid transfer between vessels without disturbing bottom yeast lees or introducing unwanted splashing.
- Oxygen-Free Sanitizer (Star San or Potassium Metabisulfite): Every tool that contacts must or wine after the boil or crush must be chemically sanitized.
Fermentation Stages & Timeline: From Vineyard to Bottle
| Fermentation Phase | Vessel & Setup | Typical Duration | Specific Gravity (SG) Target | Primary Action Required |
|---|---|---|---|---|
| Must Preparation & Maceration | Primary Open Bucket | 24 Hours | 1.085 – 1.095 (21–23° Brix) | Crush fruit, add Campden tablet, adjust acid/sugar |
| Active Primary Fermentation | Primary Bucket with Airlock | 5 to 7 Days | Drops from 1.090 to ~1.010 | Punch down fruit cap twice daily; check temp |
| Secondary Anaerobic Chill | Glass Carboy (Zero Headspace) | 14 to 21 Days | 0.992 – 0.998 (Dry Finish) | Rack off heavy fruit lees; seal under airlock |
| Clarification & Bulk Aging | Glass Carboy or Oak Cask | 3 to 6 Months | Stable (<0.996) | Rack every 60 days; add sulfites; degas |
| Bottling & Cellar Maturation | Glass Wine Bottles & Corks | 6 to 24 Months | Stable | Store horizontally at 55°F (13°C) |
Master Blueprint: 5-Gallon Classic Homestead Red Wine
This master formulation yields approximately 25 to 28 standard 750ml bottles of balanced, medium-bodied red wine with 12.5% to 13.0% ABV.
Must Formulation Ingredients
- Fresh Wine Grapes (or Premium Varietal Must Concentrate): 75 to 80 lbs (35kg) fresh clusters, or two 6-quart tins of premium wine concentrate reconstituted to 5.5 gallons with filtered water.
- Potassium Metabisulfite (Campden Tablets): 5 crushed tablets (dispenses ~50 ppm free SO2 to suppress wild microbes).
- Pectic Enzyme Powder: 0.5 teaspoon (breaks down fruit pectin to ensure crystal-clear wine clarity).
- Yeast Nutrient (Fermaid-O or DAP): 2 teaspoons, divided across the first 72 hours.
- Selected Wine Yeast Strain: 1 packet (5g) Lalvin EC-1118 (for clean vigor) or Lalvin RC-212 (for rich berry aromatics).
- Potassium Sorbate (Wine Stabilizer): 2.5 teaspoons (only added before bottling if backsweetening is desired).
Step-by-Step Cellaring Protocol
- Crush and Sanitize the Must: Destem and thoroughly crush fresh grapes in a sanitized primary fermenter. Dissolve 5 crushed Campden tablets in 0.5 cup warm water and stir thoroughly into the fresh must. Cover with a clean cloth and let rest for 24 hours. This sanitizes wild vineyard yeasts and bacteria without impeding the commercial yeast pitched later.
- Enzyme & Gravity Verification: After 24 hours, stir in the pectic enzyme. Using a sanitized test jar and hydrometer, measure the starting Specific Gravity (SG). Ideal starting gravity is 1.085 to 1.095. If gravity is below 1.085, dissolve pure cane sugar (chaptalization); if above 1.100, dilute with spring water to prevent yeast osmotic shock.
- Yeast Rehydration and Inoculation: Rehydrate the yeast in 2 oz of warm (100°F–105°F / 38°C–40°C) filtered water for 15 minutes. Stir gently and pour over the surface of the must. Fit the lid and airlock. Maintain ambient temperature between 68°F and 75°F (20°C–24°C).
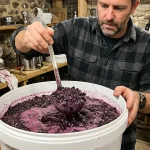
- Managing the Primary Cap: As carbon dioxide gas builds, fruit skins float to form a thick “cap” on top. Using a sanitized stainless steel spoon or potato masher, gently punch down the cap into the juice twice daily. This prevents mold formation and extracts vital tannins, anthocyanins, and color pigments.
- First Racking to Secondary Carboy: When the hydrometer reads between 1.010 and 1.000 (usually Day 5 to 7), press the skins through a sanitized nylon straining bag. Siphon the cloudy liquid into a 5-gallon glass carboy, filling the neck to within 2 inches of the rubber bung to eliminate oxygen exposure. Seal with a three-piece airlock.
- Secondary Fermentation & Fining: Allow the wine to ferment completely undisturbed for 2 to 3 weeks until gravity drops below 0.998 and bubbling stops. Siphon the clear wine off the bottom sediment into a clean carboy. Add 1 crushed Campden tablet per gallon to protect against oxidation, and store in a cool, dark cellar (55°F–60°F / 13°C–15°C) for 3 to 6 months of bulk aging.
- Bottling: Siphon the clarified wine into sanitized bottles, leaving 0.75 inches of headspace beneath the cork. Insert natural or composite corks with a floor corker. Store bottles upright for 3 days, then lay them horizontally on wine racks to keep corks moist.
Preventing Oxidation and Common Flaws
Home wine quality is preserved through vigilant attention to ambient details:
- Headspace Management: During primary fermentation, oxygen is beneficial for yeast reproduction. Once gravity drops below 1.010, oxygen is your wine’s worst enemy. Never leave more than 1 to 2 inches of empty space in glass carboys during aging.
- Sulfite Maintenance: Add 1 crushed Campden tablet (or 1/4 tsp potassium metabisulfite per 5 gallons) at every other racking. This neutralizes free oxygen radicals and prevents acetobacter from turning your vintage into vinegar.
Learn more about fruit fermentation in our beginner tutorial on making your own wine at home or check our comprehensive guide on Stardew Valley wine crafting.
Frequently Asked Questions About Winemaking at Home
Can I make wine at home using standard baker’s yeast?
While bread yeast will ferment sugar into alcohol, it produces strong bready off-flavors, low alcohol tolerance (stalling around 6–8% ABV), and fails to clear well. Dedicated wine yeast strains like Lalvin EC-1118 or K1-V1116 cost just a few dollars and produce clean, clear, restaurant-quality wine.
How do I know when fermentation is completely finished?
Never rely solely on airlock bubbling to determine fermentation completion. Take two hydrometer readings 48 hours apart. If the specific gravity reads consistently between 0.992 and 0.996 on both days, terminal fermentation is complete.
How long does homemade wine need to age before opening?
Light fruit and white wines are crisp and ready to drink after 3 to 6 months of aging. Robust, tannin-heavy red wines improve dramatically with 12 to 18 months of cellar maturation, allowing sharp acids to soften and complex aromatic bouquets to develop.
Get our latest guides, news, and insights highlighted in your Google Search & AI Overviews.